By Anna-Karin Evaldsson

Mosaic Butterflies By Anna-Karin Evaldsson
- Materials
- Instructions
- Tim Holtz Distress® Sprayer
- Ranger Palette Knife Set
- Ranger Ink Blending Tool & Foam
- Ranger Non-Stick Craft Sheet™
- Ranger Multi-Medium Matte
- Archival Ink™ #0 Pads Jet Black
- Tim Holtz® Distress Ink Pads: Pumice Stone, Hickory Smoke
- Ranger Specialty Stamping Paper
- Sizzix Tim Holtz – Due Butterflies
- Tim Holtz idea-ology – Grungeboard, Mini Burlap Panels
- Tim Holtz idea-ology – Word Bands, Game Spinners, Sprocket Gears, Mini Sprocket Gears, Long Fasteners, Screw Eyes, Game Pieces, Letterpress Letters
Instructions
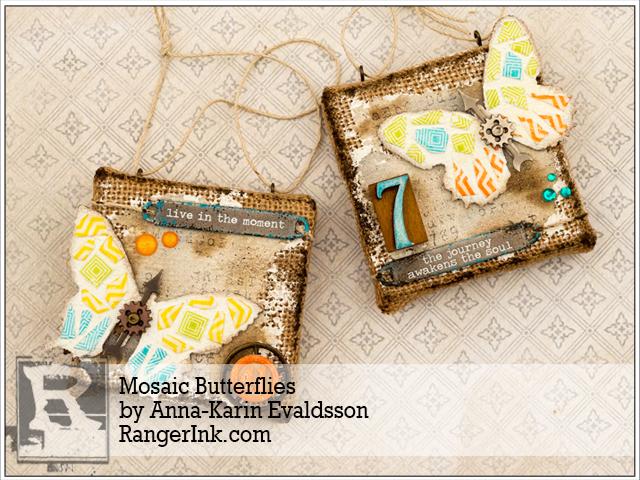
Hello everyone! It is Anna-Karin here today with a fun tutorial using the Distress Paper Mosaic Kit.

I love the look of mosaic and thought it fit well for some spring-time butterflies. You can do the same technique on many surfaces and shapes. Just use smaller tiles for a smaller shape. If you want to see another example using the Distress Paper Mosaic Kit, I decorated wooden pen holder with mosaic hearts, with a tutorial on my blog (link: here). Let’s start.
 Step 1: Start by preparing the burlap panels with a little white gesso.
 Step 2: The grout that comes in the Mosaic Kit has a lovely rough texture and I decided to also use it on the panels. Apply a thin and even layer over the dry gesso, but don’t cover all the gesso completely. Leave to dry.
 Step 3: Die cut two butterflies from grungeboard.
 Step 4: Cover the butterflies with grout using a palette knife. Leave to dry completely.
 Step 5: You can use patterned paper for the tiles, but I decided to stamp my own instead, so that I could pick the patterns and colours. Since I didn’t need large pieces, I inked background stamps with two colours ink and stamped on Specialty Stamping paper. The Ranger dye inks have such fun vibrant colours.
 Step 6: Cut the papers into tiles.
 Step 7: Glue the tiles to the butterflies with the Mosaic Glue. Add a thin layer of glue over the tiles too, to make sure they are stuck down well. Leave to dry.
 Step 8: Now to the really cool step. Apply Distress Paper Mosaic Glaze on all the tiles. The glaze is very thick and it doesn’t run, so it is easy to apply. Set aside to dry.
 Step 9: When the glaze is completely dry, ink the edges on the butterfly with Hickory Smoke and Ground Espresso.
 Step 10: Paint the grout background with watered-down Pumice Stone, Hickory Smoke and Ground Espresso.
 Step 11: You can stamp on the grout too. When the paint is dry, stamp with an alphabet background stamp and Archival Jet Black ink.
 Step 12: Paint a Game Piece and a Letterpress letter first with white and then, when dry, with Spiced Marmalade and Mermaid Lagoon.
 Step 13: Coat with Mosaic Glaze.
 Step 14: Rub Picket Fence into the words and add some Mermaid Lagoon around the edges. Later, I also added a little bit of Ground Espresso.
 Step 15: Add a Game Spinner, Mini Gear and brad to the body of the butterfly and glue to the panel.
 Step 16: The combination of the glossy dimensional tiles and the rough grout both on the butterfly and on the background is really cool.
 Step 17: Tie the Word Band around the panel. If you want to, you can add some multi medium to the back of it first. I added Ground Espresso paint around the edges of the panels too.
 Step 18: The Game Piece was glued to a larger gear.
 Step 19: The glossy and dimensional effect of the tiles is hard to photograph. You just have to see it in real life, it is so cool.
 Step 20: Add Screw Eyes to the burlap panels, to easily hang them up with twine.
 Step 21: On the second panel, I placed the butterfly in a different position and tied the Word Band at the bottom, so that they wouldn’t be completely mirrored.
 Step 22: The Letterpress number also looks great with the Mosaic Glaze on top.
 Step 23: You can easily glue the tiles to form different patterns on the butterflies. Sometimes, you might have to cut the tiles so that they fit into the space. Don’t put them too close together.
 Step 24: One last photo, trying to capture the great glossy look of the tiles, together with the gritty look of the grout.
I hope you enjoyed this tutorial and that it inspired you to try out paper mosaic. Happy crafting!


