


by Taylor Huizenga
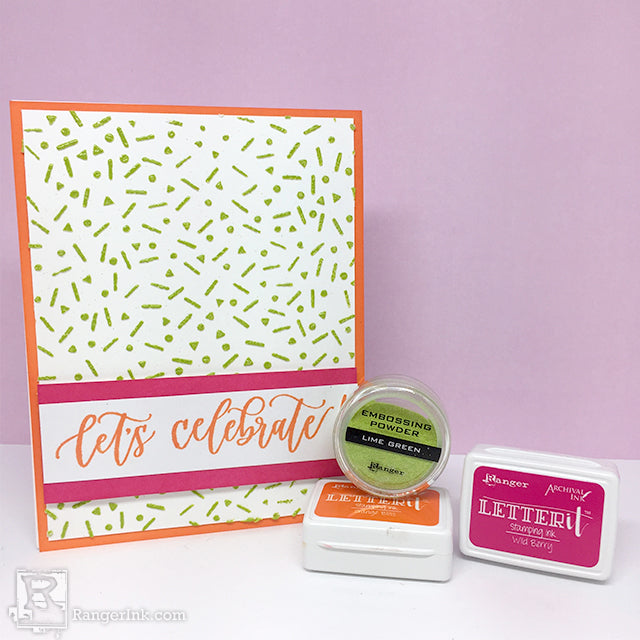
Let’s Celebrate by Taylor Huizenga
- Materials
- Instructions
- Letter It™ Stencils: Party Time
- Letter It™ Stamping Ink: Wild Berry, Orange Bliss
- Letter It™ Embossing Powders: Lime
- Letter It™ Stamp Sets: Invitation
- Letter It™ Adhesives: White Foam, Double Stick Clear Tape
- Letter It™ Acrylic Stamp Block
- Wendy Vecchi Perfect Cardstock: White Card
- Ranger Texture Paste: Opaque Matte
- Ranger Craft Squeegee
- Ranger Mini Blending Tool with Foam
- Ranger Heat it™ Craft Tool
- Ranger Non-Stick Craft Sheet™
- Cardstock
Instructions

Step 1: Place your Letter It Party Time stencil down on a piece of 4” x 5.25” white cardstock. Using a Ranger Squeegee, spread texture paste through the stencil.

Step 2: Remove stencil and cover texture paste with Lime Embossing Powder. Remove excess powder and heat.
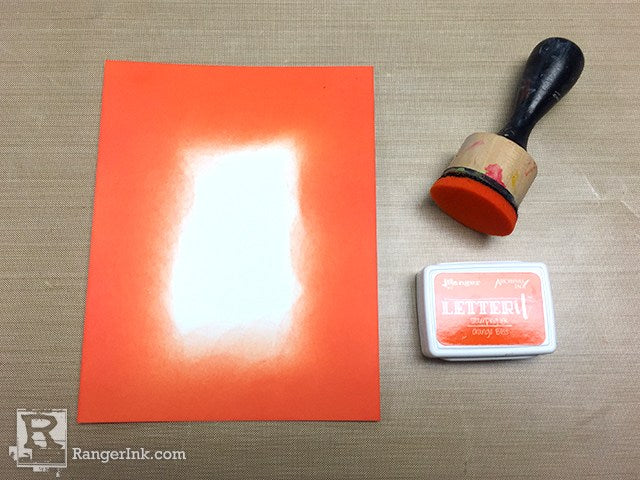
Step 3: Use a Mini Ink Blending Tool to blend Orange Bliss Archival Ink on the edges of a 4.25” x 5.5” piece of cardstock.

Step 4: Use a Mini Ink Blending Tool to blend Wild Berry Archival Ink onto a piece of 1.5” x 4” cardstock.

Step 5: With the Orange Bliss Archival Ink, stamp out the phrase “let’s celebrate” from the Letter It™ Invitation stamp set on a piece of 1” x 4” cardstock.

Step 6: Apply Letter It™ Double Stick Clear tape to the back of the “let’s celebrate” sentiment and center on the pink background. Use the same tape to apply the lime confetti cardstock to the orange panel.

Step 7: Use the White Adhesive Foam on the back of the “let’s celebrate” sentiment to add dimension behind the phrase. Apply to the card front.

Step 8: Attach the entire completed panel to a Wendy Vecchi Perfect Cardstock White folding card.

Related Posts

Simon Hurley create. Solar Spray Card by Cassie Trask
Shine bright with this shimmering floral card by Cassie Trask! In this tutorial, she uses the latest Simon Hurley create. Heartfelt...
Read More
Your Cart
- Choosing a selection results in a full page refresh.
