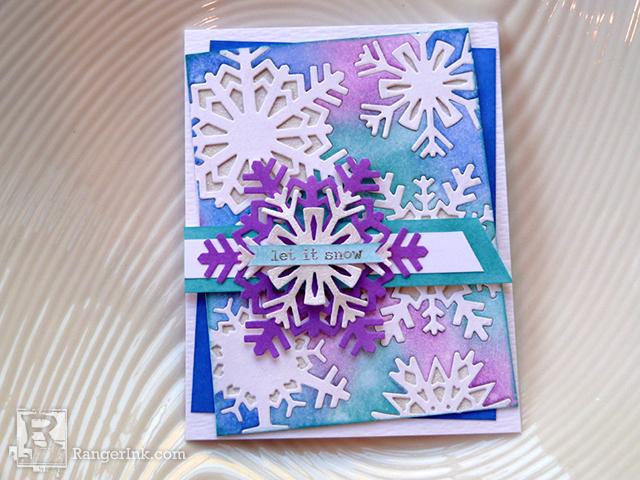
Hi everyone, it’s Audrey, and I’m excited to be back with another guest project here on the Ranger Ink blog. Today’s card project is all about the winter blues. And I don’t mean the post-holiday let-down that many of us go through each year, but instead the icy beautiful blues of a Distress Oxide winter wonderland.

Let It Snow Card by Audrey Pettit
- Materials
- Instructions
- Tim Holtz Distress® Watercolor Cardstock
- Wendy Vecchi Perfect Cardstock: Perfect White Card
- Tim Holtz Distress® Oxide® Ink Pads: Broken China, Blueprint Sketch, Wilted Violet
- Perfect Medium™
- Ranger Embossing Powders: Bridal Tinsel
- Ranger Multi-Medium: Matte
- Tim Holtz Distress® Sprayer
- Ranger Heat it™ Craft Tool
- Ranger Mini Blending Tool with Foam
- Ranger Non-Stick Craft Sheet™
- Sizzix Die Set: Paper Snowflakes
- Idea-ology Remnant Rubs: Gilded Christmastime
Instructions

Now I am normally a neutral-loving gal, but there’s something about this bright color combo that just feels so perfect for winter. The blend of blues and purple makes me think of an evening sky in the midst of a snowfall. And of course a touch of glittery sparkle feels like freshly fallen snow. Surely a combination that will chase away any winter blahs.

If you’ve ever had trouble achieving the perfect blended background with your Distress Inks, then you really need to try the Oxides. These heavily pigmented inks smooth like butter, particularly when used with Ranger Watercolor cardstock, like I’ve done today. I’ve got all the step-by-steps to share, so let’s take a closer look.

Step 1: Begin by trimming down some watercolor cardstock into one 4.25” x 5.5” and one 4” x 5.25” panel. Set the larger piece aside for now. Working on the smaller panel, lay out a variety of snowflake dies onto the paper, so that the edges of the snowflakes extend off the edges of the panel. Use a bit of low-tack tape to hold the dies in place, and then run the panel through your die cutting machine.

Step 2: Remove all the die cut snowflakes from the panel, and poke out the inner detail pieces from each snowflake. Be sure to retain the corner pieces that were clipped off during the die cutting process. Using a mini ink blending tool, apply Broken China, Blueprint Sketch, and Wilted Violet Distress Oxide inks in a random pattern over the die cut cardstock panel.

Step 3: Mist the inked panel with clean water using the Distress Sprayer. Leave the water for about 30 seconds, and then blot it with a clean cloth or paper towel.

Step 4: Trim a 4” x 5.25” piece of watercolor cardstock. Dab a Perfect Medium embossing ink pad over the entire panel. Cover the paper with Bridal Tinsel embossing powder, and then heat set the powder using a Heat-It tool.

Step 5: Coat the back of the die cut snowflake panel with small dots of Multi-Medium Matte adhesive, and then glue it to the embossed panel, lining up the edges on all sides. Dab adhesive onto the back of each snowflake, and inset them back into their die cut openings.

Step 6: After inlaying all of the die cuts, you should be left with open corners. Gather those pieces that you set aside from before, and ink them with the Distress Oxide Inks. I waited until this stage to ink the corner pieces so that I could gauge what color I needed to use to match the rest of the panel. A good tip for inking very small pieces like this is to place them temporarily down onto some low-tack tape, which will keep them from shifting while inking. Spray the corner pieces with water, and blot it dry. Then adhere the corners in place.
*If you still have spots around the edges that need to be filled in, add those. Or simply trim down your panel a bit to remove those areas, which is what I’ve done. Once you’re done, ink the edges with Broken China Oxide using the Ink Blending Tool.

Step 7: Trim a 4” x 5” piece of watercolor cardstock, and working on the smooth side of the cardstock, apply Blueprint Sketch Oxide to the edges of the panel. The middle section will be covered, so don’t worry about inking the center. Layer the snowflake panel and the Blueprint Sketch panel, and adhere them together at an angel. And then adhere this at an angel onto the larger piece of watercolor cardstock that was set aside.

Step 8: Ink a smaller piece of watercolor cardstock with Wilted Violet Oxide that is just big enough to die cut the largest die shape from the set.

Step 9: Die cut the largest snowflake from the Wilted Violet panel. Die cut a smaller snowflake from plain watercolor cardstock. Coat the smaller snowflake with Perfect Medium Embossing Ink, and then coat it with Bridal Tinsel Embossing Powder. Heat set the powder with a Heat Tool.

Step 10: Ink a scrap piece of watercolor cardstock with Broken China Oxide. Trim a thin strip. Apply a remnant rub sentiment, and trim the ends into a v-notch.

Step 11: Adhere the card panel to a 4.25” x 5.5” Perfect White card base.

Step 12: Trim a .75” x 4.25” strip from the remaining Broken China Oxide paper. Trim the right end into a diagonal. Trim a .5” x 3.75” strip of watercolor cardstock, and trim the right end into a diagonal. Adhere the white strip onto the center of the Broken China strip. Adhere the large purple snowflake to the left side of the layered strip. Add foam adhesive onto the back of the embossed snowflake, and adhere it to the center of the larger one. Adhere the sentiment strip onto the center of the stacked snowflakes. Add foam adhesive to the back of all, and attach it to the card base.

Your Cart
- Choosing a selection results in a full page refresh.


