by Tracy Scott

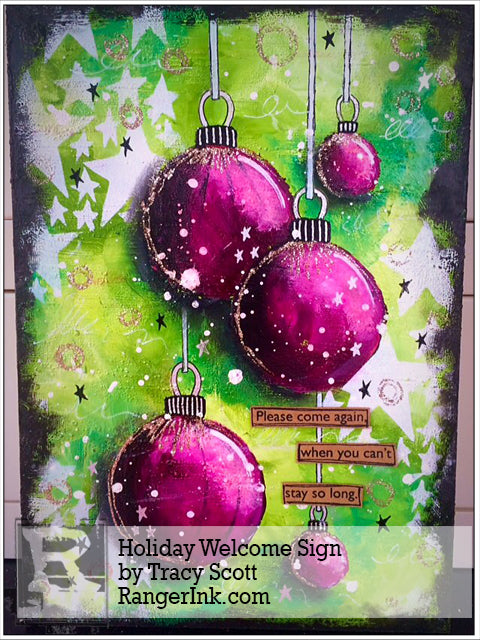
Holiday Welcome Sign by Tracy Scott
- Materials
- Instructions
- Dylusions Paint : Dirty Martini, Fresh Lime, Vibrant Turquoise, Pomegranate Seed, Cherry Pie, Bubblegum Pink, Black Marble, White Linen
- Dylusions Stencils : Small Stars
- Dylusions Cling Mount Stamps : Ugh! People!
- Dina Wakley Media Gesso : White Gesso
- Dina Wakley Media Brushes
- Dina Wakely Media Board
- Tim Holtz® Distress Splatter Brush
- Ranger Ink Blending Tool & Foam
- Stickles™ Glitter Glue : Mercury Glass
- Tim Holtz® Distress Crayons : Black Soot, Picket Fence
Instructions

Hey there,
My name is Tracy Scott and I’m a mixed media artist from East London in the UK and I’m here today with a ‘Holiday’ themed tutorial using Dyan’s most fabulous Dylusions Paints and products….
Holiday preparations are well and truly underway in our house, present shopping and wrapping is happening as we speak and plans for all the lovely home cooked goodies we will be having this season to share with family and friends.
For my tutorial today I wanted to show you how easy it is to paint your own holiday welcome sign (Dyan Style of course !!!) for when all of those guests come to visit !!

Step 1: I chose an 11×9 wood panel for my substrate but you could easily adapt this to use one of Dina’s fabulous mixed media boards (it wouldn’t be quite so heavy to hang !!) I coated the whole board with gesso and then using a mix of Dylusions paint, I used Fresh Lime, White, Vibrant Turquoise and Dirty Martini, I spread these randomly over the board with my fingers blending the colours together as I went.

Step 2: I force dried with a Heat it Tool allowing the paint to blister and bubble slightly to add a little texture to my piece (I didn’t want too much texture as this would be harder to paint over later)

Step 3: My favourite colour combination at the moment is Dylusions Pomegranate, Cherry Pie and Bubblegum Pink, they are just so totally rich when used together on a project and when used against the greens in this background it is just stunning !!!

Step 4: Starting with the Pomegranate first I used my fingers to paint this on in a circle on my board, layering the Cherry Pie on top and then the Bubblegum Pink on top of that, allowing the colours to slightly blend together as they are applied, thinking about where the light and shadow will fall and which direction the light is coming from I finally added white for a highlight.

Step 5: I repeated this process in several places over my board paying attention to the ‘light source’ to add shadow and highlights with the paints. (I partially overpainted one of the circles so that it appeared to be tucked into the background to add some more depth)
light is coming from I finally added white for a highlight.

Step 6: Using a mix of the green and blues paints again I added some shadows to my board using the same ‘light source’ as used for the circles.

Step 7: Moving on to the Black Dylusions paint and a small paint brush I painted in the top of my baubles, down the left hand side (again paying attention to my light source) and added some line details to some to give added interest.

Step 8: Using the black and white Distress Crayons I began adding more shadow and light details both on the baubles rubbing in with my finger but also using the black underneath to add even more depth.

Step 9: Using Dyan’s fabulous paint pens I started to add some finer details to my painting, adding the strings to my baubles so that they can hang in the tree.
 >
>
Step 10: Next I took the small Dylusions Stars Stencil and some White Linen Dylusions paint and added randomly to my background, I masked off the baubles with some washi tape and used a blending tool to get a good coverage on the white.

Step 11: Of course you can’t have baubles without a bit of glitter and the Mercury Glass Stickles is just perfect to add a little touch of sparkle. I added randomly on the baubles and then added touches around the board.

Step 12: Water down some White Dylusions Paint and use the Tim Holtz Splatter Brush, add randomly all over the board, force dry with a Heat Gun so that the drips bubble.

Step 13: To frame the edge of my board I used the Black Distress Crayon and started to layer on, smudging with my fingers and building up the layers.
 >
>
To finish my project I just had to choose one of Dyan’s ‘fabulous’ quotes and I knew that this one was just perfect….a holiday welcome sign…’Dyan’ style !!!
Thank you for stopping by today. I’ve had an absolute blast creating this project and know that you will too. Give it a go and have a very happy holiday xx


