- Tim Holtz® Alcohol Inks : Aqua, Cloudy Blue
- Tim Holtz® Adirondack® Alcohol Ink Snow Cap Mixative
- Tim Holtz® Adirondack® Alcohol Ink Metallic Mixatives : Gold
- Tim Holtz® Adirondack® Alcohol Blending Solution
- Tim Holtz® Distress Mixed Media Archival Ink Palette : Black Soot
- Tim Holtz® Waterbrush : Detailer Brush
- Tim Holtz® Distress Crayon Kits : Set #7
- Tim Holtz® Distress Crayons : Picket Fence
- Tim Holtz® Distress Ink Pads : Vintage Photo
- Tim Holtz® Distress Paint : Picket Fence
- Tim Holtz® Distress Spray Stains : Evergreen Bough
- Tim Holtz® Distress Glitter : Clear Rock Candy
- Ranger Glossy Accents™
- Ranger Metal Foil Tape Sheets
- Ranger Surfaces Watercolor Paper
- Ranger Adhesive Foam Rolls
- Tim Holtz® Idea-ology: Adornment - Pinecone
- Tim Holtz® Idea-ology: Assemblage Clock
- Tim Holtz® Idea-ology: Decorative Deer
- Tim Holtz® Idea-ology: Remnant Rubs - Gilded Christmas
- Tim Holtz® Idea-ology: Paper Stash - Tidings
- Tim Holtz® Idea-ology: Woodlands Tree Lot - Small
- Tim Holtz® Sizzix: Mini Festive Greenery Thinlits Set
- Tim Holtz® Sizzix: Snowflake Thinklits Set
- Tim Holtz® Sizzix: Vagabond
- Tim Holtz® Stampers Anonymous: CMS282 Scribble Woodland
- Glue Gun
- Twinkle Lights
- Pliers
Instructions


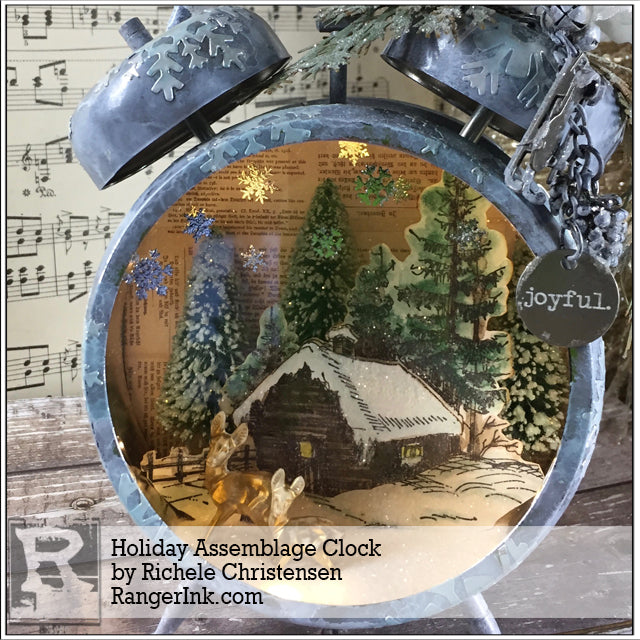
Step 1: Using pliers take the Assemblage Clock apart. Die cut snowflakes using Metal Foil Tape Sheets. Peel and stick the snowflakes to the clock and bell pieces. Apply Snow Cap Alcohol Ink Mixative to a felt pad with a few drops of Blending Solution and pounce all over the clock pieces (clock body, bells, feet, hands, etc.). Apply Cloudy Blue and Aqua Alcohol Ink and a few drops of Blending Solution to the felt pad and randomly pounce over the snowflakes. Reassemble clock. Trace the back of the clock onto Tiding Paper Stash of your choice. Cut inside traced line to fit clock backing. Attach paper to the backing of the clock using foam tape.

Step 2: Stamp cabin with Distress Black Soot Archival Ink. Color image with Distress Crayons or Distress Markers, blend color with a Detailer water brush and let dry. Cut image out with scissors. Apply Glossy Accents to roof, snow and trees, pour Clear Rock Candy Distress Glitter over image, shake off excess and let dry. Attach game pieces, or the like, to the back of the cabin to elevate it off the back of the clock.

Step 3: Cut off the base of the trees and trim the back so they are flat. Spray Woodland Trees with Evergreen Bough Distress Spray Stain and let dry. Apply Picket Fence Distress Paint with fingers to the tips of the tress and let dry. Apply Glossy Accents with finger to the tips of the tress, sprinkle with Clear Rock Candy Glitter, shake off excess and let dry. Adhere trees to the back using hot glue.

Step 4: Adhere cabin to the clock with hot glue. Apply a few drops of Gold Metallic Alcohol Ink Mixative and a few drops of Blending Solution to a cotton swab. Rub the color on the deer and then use the dry end of the cotton swab to rub off the high point to create shaded areas. Trim the deer’s front legs as needed. Adhere deer to the clock with hot glue. Color Type Token with Picket Fence Distress Crayon and wipe off excess. Crayon will remain in the letters.

Step 5: Die cut greenery from green cardstock, sand and ink the edges with Vintage Photo Distress Ink using an Ink Blending Tool. Apply Snow Cap Alcohol Ink Mixative to the metal pieces (jingle brads, pinecones, ice skates, jump rings and swivel clasp and chain). Apply Clear Rock Candy Glitter to greenery and metal pieces with Glossy Accents, let dry. Install twinkle lights around the face of the clock if desired.

Step 6: Adhere greenery to clock using Glossy Accents. Attach jingle bells, ices skates, and pinecones to swivel clasp with jump rings and attach to handle. Tie Crinkle Ribbon around the clock handle with a big bow. Apply Remnant Rubs snowflakes to glass front and the inside as desired. Add Clear Rock Candy Glitter to the inside of the clock for snow and put backing on clock.


