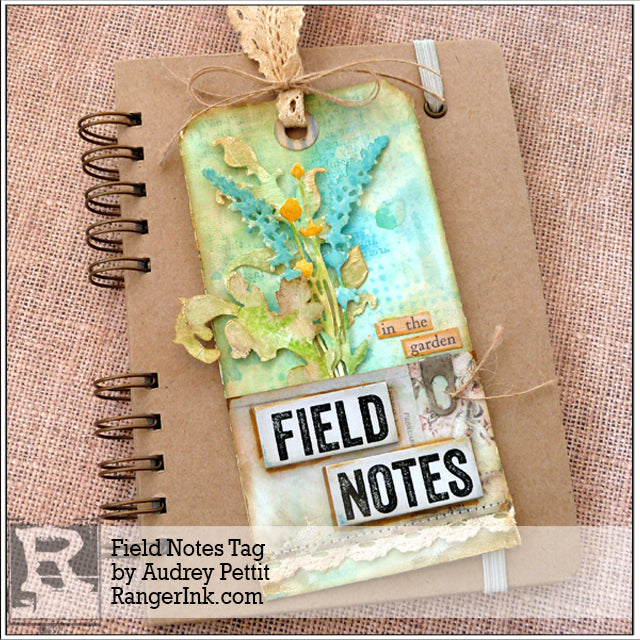
Hi everyone, it’s Audrey, and I’m so excited to be here today sharing a spring-inspired art tag project with you featuring lots of different ways to use the new Distress Oxide Ink Pads!

Field Notes Tag by Audrey Pettit
- Materials
- Instructions
- Tim Holtz Distress® Mixed Media Heavystock
- Tim Holtz® Distress Watercolor Cardstock
- Tim Holtz Distress Oxide Ink Pads : Broken China, Cracked Pistachio
- Tim Holtz® Distress Ink Pads : Brushed Corduroy, Twisted Citron, Pumice Stone
- Tim Holtz® Distress Markers : Wild Honey, Cracked Pistachio, Mowed Lawn
- Tim Holtz® Distress Crayon Kits : Set #3
- Ranger Glossy Accents™
- Ranger Texture Paste : Opaque Crackle
- Ranger Multi-Medium : Matte
- Ranger Artist Brush Set
- Ranger Non-Stick Craft Sheet™
- Ranger Heat it™ Craft Tool
- Tim Holtz® Distress Sprayer
- Ranger Mini Blending Tool with Foam
- Dina Wakley Media Palette Knife
- Tim Holtz Idea-ology Memoranda Paper Stash, Clippings Stickers, Quote Chips, Index Clips
- Tim Holtz Alterations by Sizzix: Tag & Bookplates Movers & Shapers Die, Wildflowers Thinlits Die Set, Scroll Bigz Die
- Tim Holtz by Stampers Anonymous: Latticework Stencil, Dot Fade Stencil, Reflections Stamp Set
- Lace
- Twine
Instructions

I know you’ve all been as excited about the new ink pads as I have, and if you don’t own them yet, I know you’re going to love them! This fun tag uses the Oxide Inks in many different ways, including ink blending, water blending, water coloring, and even stamping. Let’s take a closer look.

Step 1: To begin, die cut a tag shape from Mixed Media Heavystock paper, or select one of Ranger’s many ready-made tags. Using a Mini Ink Blending Tool, blend Broken China and Cracked Pistachio Distress Oxide Inks onto the tag. This puts down a nice base layer of color as a starting point.

Step 2: Swipe both Distress Oxide Ink pads onto a Non-Stick Craft Sheet and spray the inks with water using a Distress Sprayer. Dab the front of the tag into the ink mixtures. You can repeat this process as many times as you wish to achieve the color intensity you are looking for. Just be sure to dry the tag with a Heat Tool between each layer of ink.

Step 3: Place the Latticework stencil over the top of the tag, and blend Cracked Pistachio Oxide Ink onto select areas of the tag using an Ink Blending Tool with foam.

Step 4: Place the Dot Fade stencil onto the tag, and blend Broken China Oxide Ink onto other areas of the tag. You can spray the tag with the Distress Sprayer after these steps to get the ink to blend and oxidize.

Step 5: Ink up a Reflections stamp with the Broken China Oxide Ink, and repeatedly stamp partial images onto random areas of the tag.

Step 6: Die cut a second tag from Memoranda Paper Stash Paper. Trim off a 2” wide section to add as a layer on your tag. Be sure to save the hole re-inforcer shape from the die, too. Using a palette knife, apply Opaque Crackle Texture Paste to the edges and corners of both the tag and the patterned paper section. Set the paper aside to dry.

Step 7: Blend brown Distress Crayon onto the crackle paste, and blend the pigment into the cracks, wiping away any excess. If the pigment doesn’t move for you, try dipping the tip of your finger into water and rub it over the crayon to blend. Apply Brushed Corduroy Distress Ink to the edges of the tag using the Ink Blending Tool. Adhere lace trim to the bottom of the patterned paper piece using Ranger Multi Medium Matte. Then adhere the paper to the bottom of the tag (Don’t place adhesive along the very top edge of the patterned paper, though). Stitch across the bottom edge of the paper, if desired. Adhere the hole reinforcer to the top of the tag.

Step 8: Lightly ink the Quote Chips with Pumice Stone Distress Ink. Adhere them to the patterned paper section using Multi Medium Matte. Slip an Idea-ology Index Clip onto the top edge of the patterned paper. Tie a small piece of natural hemp twine around the clip, trimming off the ends into a small knot. Ink a Clipping Sticker sentiment with brown Distress Ink to add to the right side of the tag.
Die cut a variety of Scroll and Wildflower shapes from Ranger Watercolor Paper. Ink the scroll shapes with green Distress Inks using the Ink Blending Tool. I used Cracked Pistachio Oxide and Twisted Citron Distress Ink for mine. Apply a bit of Brushed Corduroy Ink around the edges. Spritz with the Distress Sprayer, and blot dry. Apply Opaque Crackle Texture Paste to the edges, and set aside to dry. Add Distress Crayon to the leaves to bring out the crackle pattern.
Watercolor the Wildflower shapes using a mixture of Distress Markers and Oxide Inks. Apply Gloss Accents to some of the flowers, and set them aside to dry.

Step 9: Ink a section of lace with Brushed Corduroy Distress Ink. Thread the lace through the top of the tag, and tie a double length of natural twine around the lace to secure it in place. Tie the twine into a bow, and trim the ends as needed.

Step 10: Adhere the Scroll leaves and Wildflowers to the tag, tucking the ends behind the strip of patterned paper. Use foam adhesive behind sections of the foliage to help define the layers. Outline the chipboard and sticker sentiment pieces with Wild Honey Distress Marker. Highlight portions of the tag edges and corners with the marker, too. Smooth out the ink using a wet paintbrush.


Enjoy!


