by Nicole Wright
Festive Log House by Nicole Wright
- Materials
- Instructions
- Tim Holtz® Alcohol Inks: Poppyseed, Meadow
- ICED Enamels Relique Powders: Pewter
- Tim Holtz® Distress Ink Pads: Ground Espresso, Embossing Ink
- Tim Holtz® Distress Spray Stains: Ground Espresso, Vintage Photo, Fired Brick, Twisted Citron, Picket Fence, Hickory Smoke, Peeled Paint
- Tim Holtz Alterations by Sizzix : Village Dwelling Die, Village Winter Die
- Other: Wood Craft Coffee Sticks, Wood Craft Dowels, Wood Craft blocks, Emerald Creek Crafts Metal Charms, Tinsel Twine, Jute, Mini Lights, Frosted Film, Hot Glue
Instructions

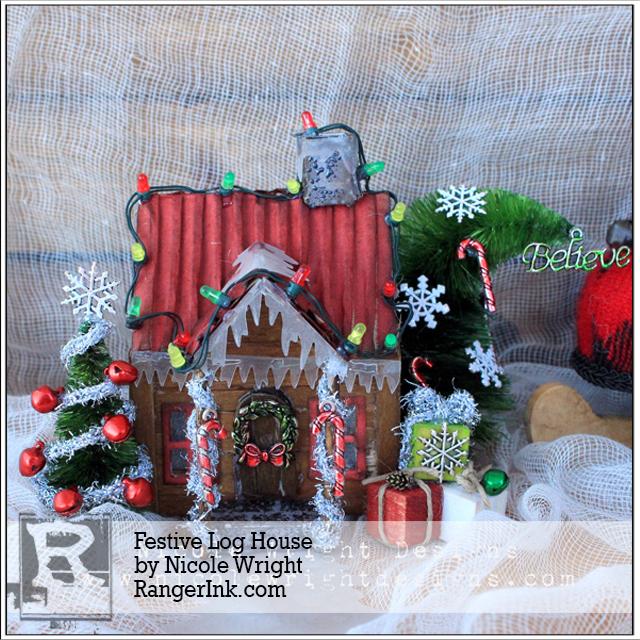
Hi Ranger fans, Nicole here and I am back with a Festive Holiday Log House Dwelling. These wee houses are very popular. There are so many ways you can alter them. You can stamp, stain, ink, paint or add texture paste to make them unique. I wanted to create a wood effect using actual wood. Check out this step by step where you will learn how to create your own log house dwelling.
 Step 1: I cut the Village Dwelling with mat board. Then I used the accessory Village Winter die to cut out the window frame and icy pieces. I picked these wood coffee sticks up at the dollar store. These are thinner than a popsicle stick.
 Step 2: Trim the rounded edges of the sticks and add a thin line of hot glue to the dwelling, then attach the stick. You can trim the extra off once it’s in place. Get ready to do some trimming to go around the windows and doors.
 Step 3: Dry fit your stick as you go around the windows. Use a pencil to mark where you cut. Trim each piece and glue as you go. Dry fit the stick to go around the rounded door and mark your angle with a pencil and trim. Once it fits, glue into place.
 Step 4: Follow this technique for the whole house to create your log house. Who doesn’t want to be a log house builder! I took the door off and glued one stick in the center.
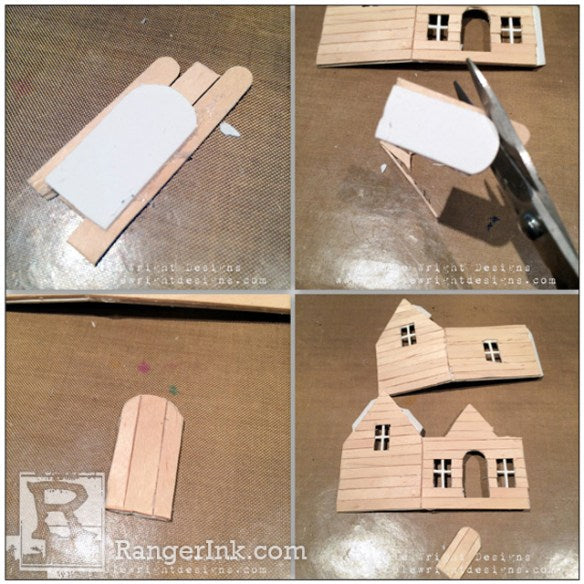 Step 5: Add the 2 end pieces, then trim. By doing this the door will look even.
 Step 6: Once the wood is on you can connect the house. This is where you will see the white of the mat board and the rough cuts of the wood. Let’s hide that with more sticks, creating a finished edge. You will need 2 pieces for each side. Trim to length and overhang the piece a bit.
 Step 7: Glue the finished wood edges to all 4 four corners. Now for the fun! I used Vintage Photo Distress Sprays Stain for my log house. Simply spray onto the house and the wood soaks in the stain.
 Step 8: You can use some paper towel to rub off the extra stain. To create contrast I sprayed the door with Ground Espresso.
 Step 9: For the wood pillars I used small craft dowels, also from the dollar store, sprayed in more Ground Espresso Distress Spray Stain. Set aside to decorate later. The step and chimney were sprayed with Hickory Smoke Distress Spray Stain. I used the bricked stencil and the Iced Enamel Relique Powder. I love this stuff!
 Step 10: Cut the windows out using the village winter die. For a pop of color the window frames are gorgeous with Fired Brick Distress Spray Stain and a little Ground Espresso Distress Ink for the edges. I added some frosted film to the inside of the windows for a chilly effect.
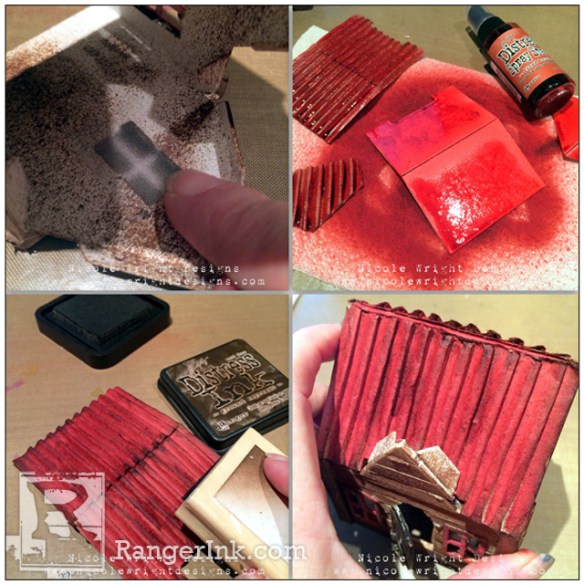 Step 11: Once the windows have been frosted the roof can be built. I love the tin roof look for wood houses. So I cut some corrugated cardboard and inked with more Fired Brick Distress Spray Stain. Ink the edges of the roof with more Ground Espresso Distress Ink.
 Step 12: Attach the roof to the house and start to decorate! I always love this part. I love using these mini vintage lights on my holiday projects. I attached them around the roof with hot glue. Wrap silver tinsel twine to the dowel pillars. You can distress the tinsel with a heat gun giving it a vintage feel. Then attach to the house.
 Step 13: I sprayed the woodland trees with Peeled Paint Distress Spray Stain ready for some charms. The snowflake charms are perfect with Picket Fence Distress Paint. I used Alcohol Inks Poppyseed for the Candy Canes and Meadow for the Believe Charm. These small wood blocks are perfect gifts inked with more Distress Spray Stain Fired Brick, Twisted Citron and Picket Fence.
 Step 14: I used more frosted film cut with the village winter die to make all the icy parts. The woodland tree looks awesome with all the inked charms. I bent the tree top over as it holds the weight of the Believe Charm.
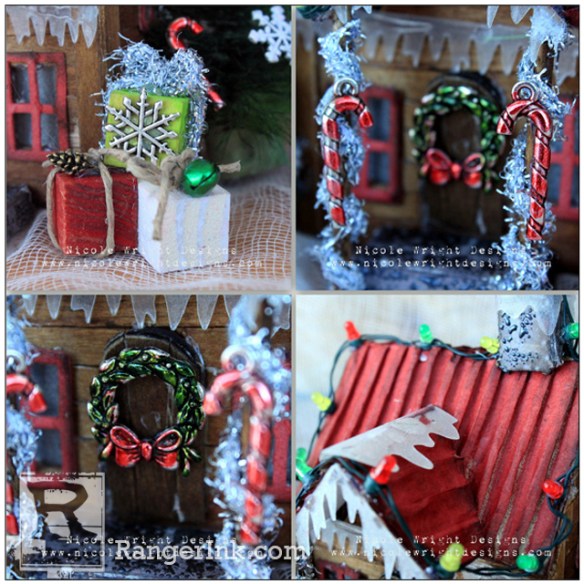 Step 15: You can decorate the wee presents with charms, jute and tinsel twine. Alcohol Inks are a great way to add color to your metal charms.
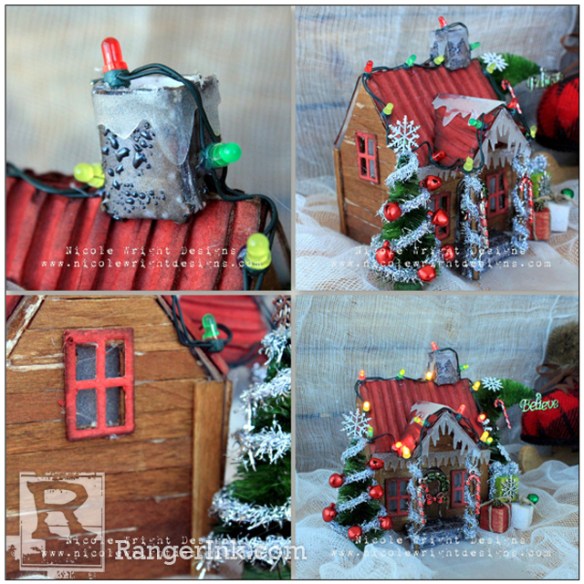 Step 16: I love the Iced Enamel on the chimney. The log wood siding is easy to create and works great with the Distress Spray Stains. When you pull all your Ranger stuff together you can create any look you want with any material you may have.
I bet you’re thinking about those popsicle sticks, coffee sticks and wood dowels in a whole new light. Combined with Distress Spray Stains the possibilities are endless!
Happy Holiday Crafting.


