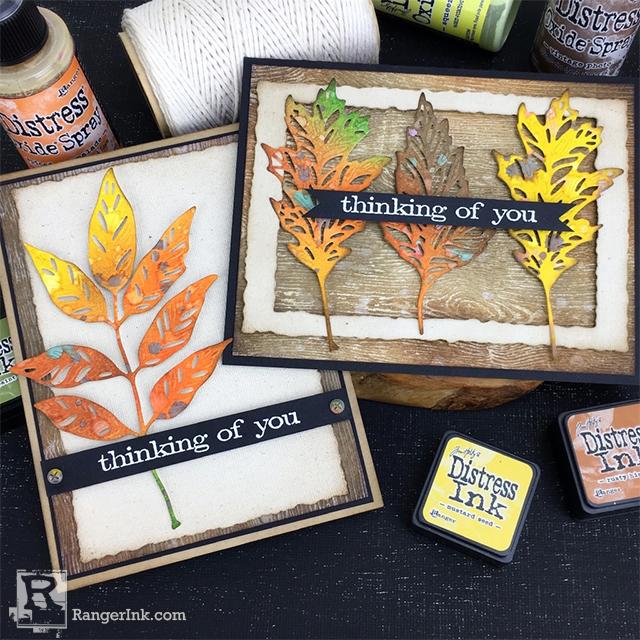
In this tutorial, Bobbi Smith combines Distress Ink and Oxide Sprays to create beautiful fall inspired backgrounds. Follow along as she transforms the backgrounds into stunning handmade Thinking of You Cards.

Fall Thinking of You Cards by Bobbi Smith
- Materials
- Instructions
-
Tim Holtz Distress® Oxide® Spray: Fossilized Amber, Squeezed Lemonade, Spiced Marmalade, Mowed Lawn, Peeled Paint, Vintage Photo, Walnut Stain
Tim Holtz Distress® Mini Ink Pad: Mustard Seed, Fossilized Amber, Spiced Marmalade, Rusty Hinge, Mowed Lawn, Peeled Paint, Frayed Burlap, Gathered Twigs
Tim Holtz Distress® Paint: Antique Linen, Fossilized Amber, Rusty Hinge, Frayed Burlap
Tim Holtz Distress® Woodgrain Cardstock
Ranger Embossing Powder: White Super Fine Detail|
Ranger Anti-Static Pouch
Letter It™ Clear Embossing Ink Pad
Ranger Mini Ink Blending Tool with Foam
Ranger Heat It Craft Tool
Tim Holtz Distress® Sprayer
Ranger Brayer: Small
Letter It Black Foam Roll Tape
Tim Holtz Distress® Collage Medium: Matte
Tim Holtz® by Tonic Studios: Craft Pick and Scissors
Tim Holtz® Idea-ology Hardware Heads
Tim Holtz® by Stampers Anonymous Simple Sayings CMS155
Tim Holtz® Alterations by Sizzix Framelits: Stacked Deckle 662694
Tim Holtz® Alterations by Sizzix Framelits: Skeleton Leaves 663094
Kraft and Black Cardstock
Sticky-Back Canvas
Instructions
Hi everyone, Bobbi here! I’m really happy to be with you on the Ranger Projects Page today. I’m sharing these rustic fall Thinking of You cards with a tutorial! Hope you’ll join me.

Step 1: Working on the Ranger Non-Stick Craft Sheet or Glass Media Mat, we’re going to start adding color to several sheets of 4 1/4 x 5 1/2 Distress Watercolor Cardstock to create the base color of our leaves. Ink up a Blending Tool with Foam using, Distress Ink (I chose several fall colors in my palette). Swirl inked Blending Tool in circular motion onto cardstock continually building color, until happy with blends. If there are any hard lines, just keep swirling color and it should blend and soften.

Step 2: Shake the Distress Oxide Spray vigorously to mix color well before each use. Then lightly spritz color onto colorized Distress Watercolor Cardstock, squeezing trigger very gently so it only releases large droplets. If you're unsure about spray coverage, unscrew lid and flick Distress Oxide Spray droplets onto cardstock. Then dry with the Heat Tool.

Step 3: Repeat step 2, building various colors of Distress Oxide Spray droplets onto Distress Watercolor Cardstock. Dry with heat tool between each new color. The colors I chose were Fossilized Amber, Squeezed Lemonade, Spiced Marmalade, Mowed Lawn, Peeled Paint, Vintage Photo and Walnut Stain.

Step 4: To add a little more distress, squeeze large droplets of water onto colorized cardstock using a Distress Sprayer. Then dry with Heat Tool.

Step 5: Die cut leaves from Sizzix Skeleton Leaves dies, using colorized cardstock.

Step 6: Apply 1 drop of Antique Linen Distress Paint to Glass Media Mat. Then roll Small Brayer thru the paint till coated. Now roll wet brayer over raised portions of wood panel. Dry panel with Heat Tool. This is going to act as a resist when applying additional inks, to really highlight the woodgrain.

Step 7: Ink up a blending tool with foam using Distress Ink (I chose Gathered Twigs and Frayed Burlap). Swirl inked blending tool in circular motion onto cardstock continually building color, until happy with blends. If there are any hard lines, just keep swirling color and it should blend and soften. Wipe off any excess ink from woodgrain to expose highlight with clean towel.

Step 8: Adhere some Sticky-Back Canvas to two 4 x 5 1/2 sheets of kraft cardstock. Then die cut two large deckle rectangles using Sizzix Stacked Deckle dies and shade with Distress Ink.

Step 9: Apply a little Distress Paint to a couple of hardware heads. The colors I used were Fossilized Amber, Rusty Hinge and Frayed Burlap.

Step 10: Cut two 7/16 x 4 inch strip of Black Cardstock. Swipe the Ranger Anti-Static Pouch over the entire surface. This helps prepare for a static free heat embossing. Ink the “Thinking of You” Stamp using the Letter It Clear Embossing Ink Pad. Then stamp phrase onto cardstock strips.

Step 11: Place stamped images on a scrap piece of paper. Generously sprinkle Ranger White Super Fine Detail Embossing Powder over the stamped images. Shake off excess Embossing Powder and return to jar. Heat stamped images with Heat Tool to melt embossing powder.

Step 12: Assemble card components on to an A2 Kraft/Black card base using Distress Collage Medium and Letter It Black Foam Tape.
I love this time of year and all the fall colors are always so inspiring! I hope you give these fun fall cards a try!
Your Cart
- Choosing a selection results in a full page refresh.


 My name is Bobbi Smith. I’ve been a crafter all my life, however I really found my niche in paper-crafting about 20 years ago, when my children were young and have never looked back. I love all forms of Art, but really gravitate towards vintage, distress and grunge styles. I live in Illinois and love to hunt for vintage finds, when I’m not paper crafting! Check out my blog at
