by Miranda van den Bosch

Easter the Dylusions Way by Miranda van den Bosch
- Materials
- Instructions
- Dylusions Creative Dyary Die Cuts
- Dylusions Paint : Lemon Zest, Tangerine Dream, Bubblegum Pink, Pure Sunshine
- Dylusions Ink Sprays : Pure Sunshine, Tangerine Dream, Bubblegum Pink
- Dylusions Paint Pens : Lemon Zest, Squeezed Orange, White Linen, Postbox Red, London Blue
- Dina Wakley Media Gesso : White
- Tim Holtz® Distress Markers : Fossilized Amber, Abandoned Coral, Carved Pumpkin, Candied Apple, Mermaid Lagoon, Blueprint Sketch, Hickory Smoke, Picked Raspberry, Salty Ocean
- Ranger Collage Glue Stick
- Ranger Enamel Accents : Gumball Pink, Cheese Puff, Lemon Twist, Electric Lime, Caribbean Coast, Glacier White, Black Tie
- Tim Holtz by Tonic Studios 5 inch mini snips
Instructions

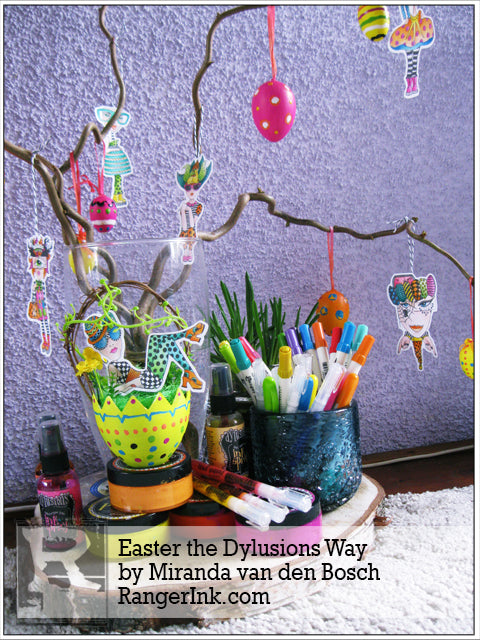
Today I want to show you how you can brighten up your Easter decorations by using the Dylusions paints. I made some cheery decoration for my Easter branches.

Step 1: I bought some plastic easter eggs and gave them a nice layer of gesso using Dina Wakley’s White Gesso.

Step 2: After the gesso is dry, use the Dylusions paints to colour all the eggs. I used Pure Sunshine, Tangerine Dream, Bubblegum Pink and Lemon Zest.
For decorating the eggs, I use the Ranger Enamel Accents and Dylusions Paint Pens.
I used the Enamel Accents to make dots, stripes and circles. The Enamels are thick acrylic paint, so you really get some nice structure when you use them on your eggs.

Step 3: The ribbon on the eggs get another colour with the Dylusions Ink Sprays. I used Bubblegum Pink, Pure Sunshine and Tangerine Dream. Just spray some ink on the ribbon and let it dry.

Step 4: The new die cuts have a perfect size for using them as decoration in your Easter branches. I picked out a few different designs and coloured them with Distress Markers, Dylusions Paint Pens and a little Distress Crayons.

Step 5: To make a skin colour I used Abandoned Coral and Fossilized Amber and blend them together with water. If you use too much Coral your skin gets to pinky and to yellowish if you use too much amber. I always try out on a little piece of paper first to see if the colour turns out ok.
I usually add 3 to 4 layers of colour before I am satisfied with the result.

Step 6: Punch out some circles and take some pieces of ribbon or rope. Furthermore you’ll need some glue and tape.

Step 7: Tape down the rope and glue a circle on top of it so the backside of the image looks nice too.

Step 8: Decorate your Easter branches with the eggs and coloured die cuts and have a cheery Easter this year.


