


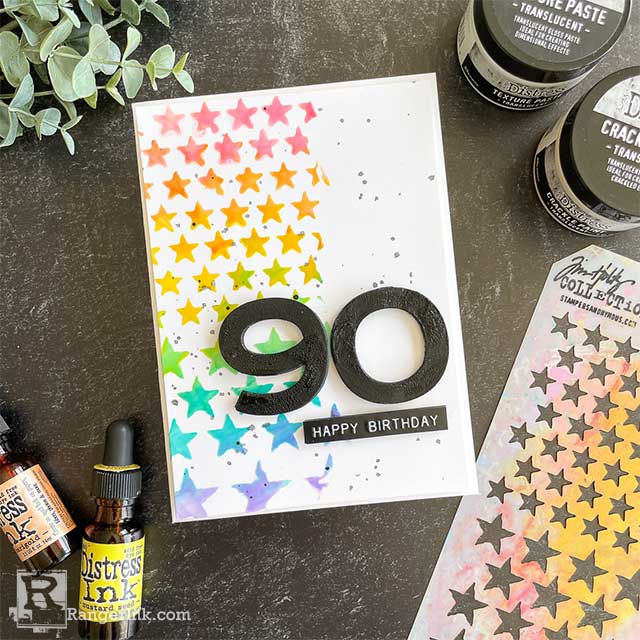
In this tutorial, Cheiron Brandon shows you how to colorize Distress Texture Paste Translucent with reinkers to make this bright and cheery birthday card.
Distress Texture Paste Birthday Card by Cheiron Brandon
- Materials
- Instructions
Tim Holtz Distress® Texture Paste Translucent
Tim Holtz Distress® Crackle Paint Translucent
Tim Holtz Distress® Ink Reinkers: Kitsch Flamingo, Mustard Seed, Dried Marigold, Cracked Pistachio, Peacock Feathers and Wilted Violet
Tim Holtz Distress® Paint Black Soot
Tim Holtz Distress® White Heavystock
Tim Holtz® Idea-ology Label Stickers Sentiments
Other:
Tim Holtz® by Stampers Anonymous Stars Stencil THS008
Tim Holtz® Alterations by Sizzix Countdown
Instructions
Hello crafty friends! It’s Cheiron Brandon and I am thrilled to be back on the Ranger blog today sharing a fun colorful project with you featuring some of the new Distress Mediums. If you haven’t seen, all the mediums now come in a new packaging that makes each medium easy to identify and gives descriptions of the properties right on the label. This makes everything so easy when reaching for a medium to create. 
Today I am working with two of the new mediums, Distress Texture Paste Translucent and combining it with Distress Crackle Paint Translucent to create a surprisingly clean and simple card. If you watched Tim’s YouTube live, he showed different ways to color this paste and also how it looks through a stencil. I loved the shiny gloss look of it and thought it would be perfect for a card I needed to make for a very special lady who is celebrating a birthday this month!

To begin, I gathered up some supplies including my Distress Texture Paste Translucent, a palette knives, Distress Ink Reinkers in Kitsch Flamingo, Mustard Seed, Dried Marigold, Cracked Pistachio, Peacock Feathers and Wilted Violet and the Stars stencil.

Step 1: On a craft sheet put a six small amounts of Distress Texture Paste Translucent and add a drop (you can always add more) or Distress Ink Reinker in each color that you want to use. We are using a dye ink to color our paste to keep it translucent.

Step 2: Use a palette knife to blend your color into the paste, wiping the knife clean in between colors.

Step 3: Place your Stars stencil over the panel of White Distress Heavystock and apply the paste. I always start by applying the yellow in the center and working my way up and then down, cleaning the knife before applying each color. When I am blending between colors, I move my palette across the colors horizontally to keep the colors true in each area.

Step 4: Remove the stencil and let the paste dry.

Step 5: Cut number dies. I cut three of each number and adhered them together with Distress Collage Medium to give them more dimension.

Step 6: Paint on a layer of Distress Crackle Paint and let it dry.

Step 7: Adhere numbers to the card panel and add an Idea-ology label sentiment.

Step 8: Add some black spatter to the card using Black Soot Distress paint and a paint brush.

Here is a closeup to see all the details of the finished card.
 My name is Cheiron Brandon. I live in Bayonne, New Jersey with my husband and our two adorable rescue pups, Big Boy and Oreo. I work in the financial district by day and love to play with stamps, ink and paint at night in my studio. I teach monthly card making and mixed media classes in NYC. You can find me on my blog at www.cheironbrandon.typepad.com and posting more often @cheiron on Instagram!
Related Posts

Simon Hurley create. Solar Spray Card by Cassie Trask
Shine bright with this shimmering floral card by Cassie Trask! In this tutorial, she uses the latest Simon Hurley create. Heartfelt...
Read More
Your Cart
- Choosing a selection results in a full page refresh.
