


Unlock the magic of layering with Tami Bastiaans. This stunning card features a clever resist technique using Distress Micro Glaze, creating depth and contrast with Distress Oxides. Watch as rich blues reveal hidden details beneath—plus, those delicate butterflies add the perfect finishing touch!
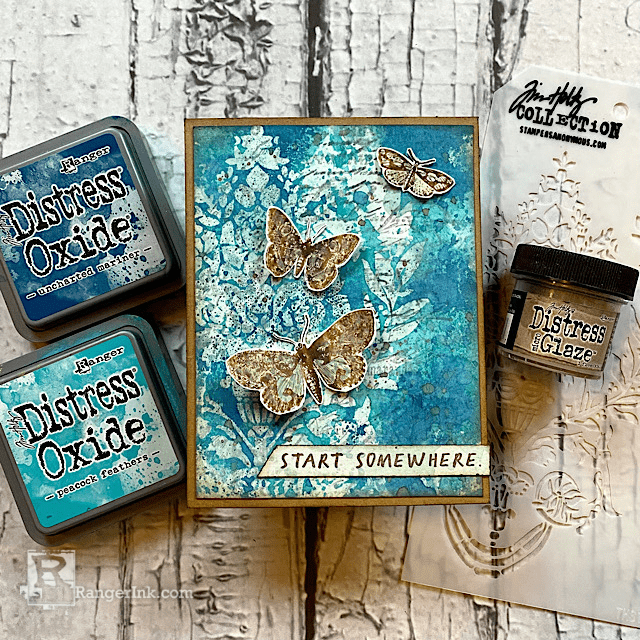
Distress Micro Glaze Card by Tami Bastiaans
- Materials
- Instructions
Tim Holtz Distress® Micro Glaze™
Tim Holtz Distress® Ink Pad Hickory Smoke
Tim Holtz Distress® Watercolor Cardstock
Tim Holtz Stampers Anonymous Stamp Noteworthy CMS446
Tim Holtz Distress® Waterbrush Detailer Tip
Tim Holtz Tonic Surface Media Mat
Tim Holtz Distress® Kraft Heavystock
Other:
Tim Holtz Stampers Anonymous Stencil Crest THS161
Tim Holtz Stampers Anonymous Stamp Papillon CMS106
Scissors
Instructions
Hello Makers! Today I have a card to share with you using Micro Glaze through a stencil. I just love Micro Glaze, and in today’s technique I used it for resisting Distress Oxides while also protecting a layer of Oxide and stamping underneath. I’m inviting you to come along, so let’s get making!

Step 1: Gather all the supplies.

Step 2: Press the Speckled Egg Oxide pad onto the Media Mat Non-stick Mat, spray it with water until it beads up, then tap the Distress Watercolor cardstock into the ink. Don’t smash the paper onto the ink, but lightly tap it, allowing some color to bead and make darker and lighter areas. Dry and repeat a few times until most of the paper is covered.

Step 3: Using a script background stamp, such as Papillon CMS106, stamp script over the Speckled Egg background with Hickory Smoke Distress Ink. Distress Ink is used because it is water reactive and will lighten with later steps. Dry with a heat tool.

Step 4: Put a stencil, such as Crest THS161, over the inked, stamped background. With a clean piece of Blending Foam on a Blending Tool, put the blending tool into the jar of Micro Glaze, getting some Micro Glaze onto the foam, then press the foam onto a nonstick mat and work the Micro Glaze evenly into the foam.

Step 5: Circular motions, press the Blending Tool over the stencil, getting an even layer of Micro Glaze over the background through the openings in the stencil. Take the stencil off and give the Micro Glaze a moment to dry. Then lightly wipe over the background with a clean cloth.

Step 6: Press the Peacock Feathers Distress Oxide pad onto the Non-stick Mat. Spray with water until the Oxide beads up. Lightly tap the Watercolor background, allowing some color to bead in areas and spray a little more water here and there to make more solid areas.

Step 7: Notice the darker Oxide will cover the areas with no Micro Glaze, and those with Micro Glaze will resist in the shape of the stencil used. Dry and repeat a few times until you are happy with that color coverage.

Step 8: To add some interest, do the same thing with an even darker Oxide. Press the Uncharted Mariner Oxide pad onto the Non-stick Mat, spray with water and lightly tap the background into the pad to pick up droplets and spots.

Step 9: Once both Oxide colors have dried, you can see the shape of the stencil with the Speckled Egg and the stamping, as well as both oxide colors. To tie in the finishing touches on the card, press the Vintage Photo Distress Oxide pad onto the Non-Stick Craft Mat, and then using a small brush, splatter brown Oxide droplets across the background and let dry.

Step 10: Trim the background down to 4x5.25 and attach it to an A2 Kraft cardbase. Use the Ground Espresso and Vintage Photo Distress Oxides on the Butterfly stamp on Papillon CMS106 and stamp on some Distress Watercolor Cardstock. Dry and color in open spaces with a little bit of Speckled Egg Oxide and a Waterbrush. Add a little Speckled Egg Oxide to a 3/8” strip of Watercolor Cardstock and dry. Using Noteworthy CMS446, ink a sentiment with Ground Espresso Distress Oxide and dry. Hand cut the butterflies and attach to the background, then finish off with the sentiment.

 Tami is a school teacher by trade, but has been crafting in some way or another most of her life. She started scrapbooking 25 years ago as a hobby outside of work. A few years later she discovered the world of Tim Holtz Distress, which led to a whole new love of stamping, die cutting, and Idea-ology. Check out Tami on her Plays Well with Paper social media sites - Instagram, YouTube, and Blog.