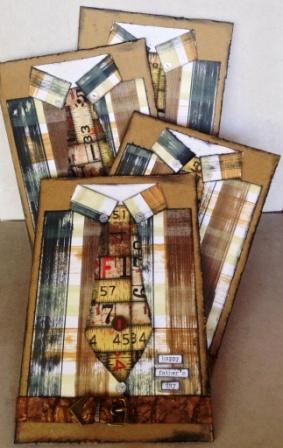
Learn how to create a plaid background using Distress Mini Ink Pads to make these handsome cards.

Distress Father’s Day Cards By Anita Houston
- Materials
- Instructions
- Ranger Non-Stick Craft Sheet™
- Ranger Specialty Stamping Paper
- Ranger Heat it™ Craft Tool
- Ranger Ink Blending Tool & Foam
- Ranger Ink Refresher
- Ranger Glossy Accents™
- Tim Holtz® Distress™ Markers: Pumice Stone
- Tim Holtz by Tonic Studios: Micro Serrated Scissors, Paper Distresser, Paper Piercer
- Coats & Clark Tim Holtz Eclectic Elements Fabric: 12x12 Crafting Pack in Melange
- Tim Holtz Idea-ology: Design Ruler, Buckles, Mini Corners, Long Fasteners, Number Brads, Chit Chat Stickers
- Paper Towel
- Paper Trimmer
- Eyelet Setter
- Foam Tape
- Eyelet
- Mini Buttons
- Pliers
Instructions
1. To create a masterboard for use in multiple projects, (Seen here, to make four cards.) start with a 12×12 piece of Specialty Stamping Paper and a Craft Ruler as your guide. To start the plaid pattern, use a Mini Distress Ink in Antique Linen and apply it directly from the pad in a straight vertical line from top to bottom. Since the ruler is clear it is easy to line everything up, and I used the line with the numbers centered through it. Place the ruler over the Antique Linen, match up the number line on the right edge of the ink line, and then apply the Mini Vintage Photo Distress Ink along the side of ruler. Wipe the ruler clean with a paper towel after each run with the inks. Repeat this pattern until you’ve reached the edge of paper. Dry thoroughly with the Heat It Tool.
2. Turn the paper so that the ink stripes now run horizontally. Repeat the lined ink swiping mentioned above using Black Soot and Walnut Stain Distress Ink Minis until you’ve reached the edge of the paper. Dry thoroughly.
3. Using a paper trimmer, cut two 1 inch pieces off of the masterboard. Then cut those in half again, and now you will have four 1×6 inch pieces. These will be the collar of the shirts.
4. Trim the remaining portion of the masterboard into four 5×6 inch pieces. These will be for the shirts.
5. Using the four collar pieces, fold each end into itself at a downward angle 1 inch in. Do the other end, and repeat with the other three collar pieces.
6. Ink the edges of all the collar and shirt pieces using the Mini Ink Blending Tool and Black Soot Distress Ink Mini. Dry. Fold four pieces of 8.5×11 inch Kraft Cardstock in half, and adhere only the backs of the collars (Leave the end parts loose for now.) and shirt pieces down using a Collage Glue Stick, making sure to leave edges of the Kraft showing.
7. Cut a 4×12 inch piece off of a 12×12 inch Melange Fabric square. Set the larger piece aside for another project, and then cut the shorter piece in half, making two 4×6 pieces, and then those in half lengthwise so that now you have four 2×6 inch pieces of fabric. These will be the ties.
8. You will free cut the shape of the ties. It’s easier to fold each piece in half lengthwise and cut. After all the cutting, ink the edges of the ties with Black Soot, and trim off any frays of fabric.
9. Using Clear Fabric Medium, apply a small thin line along the top part of the tie where the pretend knot and hanging tie meet. Fold the knotted part down and then back up into itself. You want to create the illusion that the tie is indeed knotted. This will help to make the pretend knotted part look puffier.
10. Apply a two strip of foam tape to the top of the tie. This way the bottom half of the tie will be loose.
11. Lift up the end parts of the collars and adhere the ties underneath them. Now adhere the collars down using Collage Glue Stick. Adhere a button onto each collar end, and on the shirt bottom with Glossy Accents. You can use a permanent marker to color in where the thread would be on the button if you wish. Use a Paper Distresser to roughen up the edges of the front of the card, and then ink the edges with Black Soot. Set this aside.
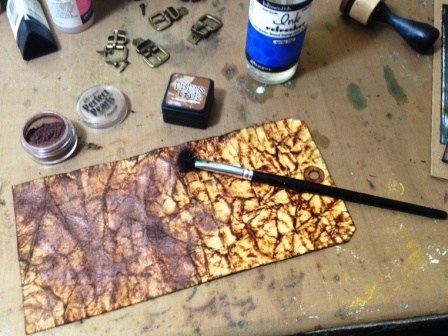
12. To make the Faux Leather look of the belt, begin by misting a #10 Manila tag liberally with Ink Refresher. Rub it in and begin to crinkle the tag up. It’s okay if residual Distress Ink gets onto the tag, as that will just enhance the look. As the tag should now be in the shape of a ball, clean up any Ink Refresher on your Craft Sheet, and then gently loosen and flatten the tag back onto the sheet.
13. Apply the Vintage Photo Distress Ink Mini directly onto the tag, covering all of the wrinkles. Get the Cappuccino Perfect Pearls and tap it once onto the mat before opening. This will prevent a plume of the fine powder from rising up. Loosen the cap, and using the Perfect Pearls Brush apply the powder several places on the tag. Work it into the wet tag gently so as to not tear it. Apply the cap back on when the tag is covered and dry thoroughly with the Heat It Tool for a few minutes. The tag will feel a little damp, but it is okay to work with.
14. Cut four 1/2 inch strips lengthwise from the tag. Use the rest for another project. Cut the four strips in half. One strip will be used for the buckle, and the other for the tongue of the belt. Ink the edges if you wish. Apply a little bit of Glossy Accents onto the buckle part with the hole, and adhere one of the Faux Leather strips. Use a Paper Piercer to punch through the leather to the hole in the buckle. Apply a Long Fastener and secure it so that the points will not be seen. Taking the other piece of Faux Leather, set an eyelet about 1-1/2 inches in. Gently take this piece and weave it through the buckle, setting the buckle poker into place, and then place the leather through the loop of the belt. Trim the tongue of the belt in the same shape as a mini corner. Apply a tiny amount of Glossy Accents into the Mini Corner, then slip it onto the belt tongue. Use pliers to clamp it down securely. The belt is now intact and ready to be adhered to the bottom of the shirt with Glossy Accents. Trim any of the belt off the sides of the card. If you accidentally tear the belt, fear not, as Glossy Accents mends it back together seamlessly, and Distress Ink covers up any marks…believe me!
15. Shake a Festive Berries Distress Paint Dabber until the ball inside moves rigorously, and apply it into the groove of the number in a Number Brad. Clean up the edges where the paint is not supposed to be, and dry. Use a paper piercer to poke a hole into the tie, and attach the brad. Carefully apply Glossy Accents into the number to give it a raised and enameled look. Choose words from the Chit Chat Sticker pack, ink the edges of them with Black Soot, and stick them into place on the card. Use a Pumice Stone Distress Marker to outline the letters for extra depth to stand out prominently.


