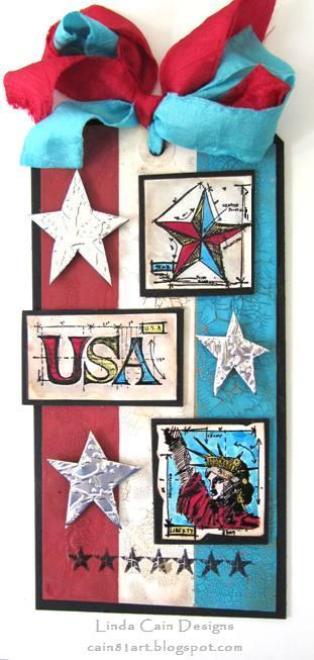
Learn to create this striking Patriotic tag with a Distress Crackle Paint background.

Distress Crackle Paint Stars and Stripes Tag
- Materials
- Instructions
- Ranger Specialty Stamping Paper
- Ranger Metal Foil Tape Sheets
- Tim Holtz® Distress Crackle Paint: Picket Fence, Broken China and Fired Brick
- Tim Holtz® Distress Stains™: Salty Ocean, Fired Brick, Festive Berries, Mustard Seed, Pumice Stone and Tea Dye
- Tim Holtz® Distress Ink Pads: Brushed Corduroy
- Tim Holtz Distress® Markers
- Super Fine Detail™ Powders: Black
- Ranger Emboss It™ Ink Pad
- Ranger Non-Stick Craft Sheet™
- Ranger Heat it™ Craft Tool
- Ranger Ink Blending Tool & Foam
- Archival Ink™ #0 Pads: Jet Black
- Tim Holtz® Waterbrush
- Dylusions Stencils: Starry Starry Night
- Stampers Anonymous Tim Holtz® Collection Cling Mount Stamps: Mini Blue Print CMS146 and Rockstar CMS073
- Tim Holtz Alterations by Sizzix – Texture Fade Cracked and Vagabond Machine
- Black Chipboard
- Hand dyed ribbons
- Blue painter’s tape
Instructions
1. Using a #12 Manila Tag and the Design Ruler, measure in 1 3/8” along each side of the tag and draw a line.
2. Mask off along the left line with painter’s tape and apply a heavy coat of Fired Brick Crackle Paint.
3. Mask off the right side of the tag and apply Broken China Crackle Paint. You should have two pieces of tape now on the middle stripe of the tag.
4. Allow this to setup and start to dry, and then gently remove the tape. Set aside to dry completely.
5. Next, on a piece of Specialty Stamping Paper stamp the 3 images with Clear embossing ink. Add the Super Fine Detail embossing powder, remove the excess and emboss with the Heat it Tool. Make several puddles of various Distress Stains on the Craft Sheet using Fired Brick, Festive Berries, Salty Ocean, Tea Dye, Mustard Seed and Pumice Stone. You can pick up the color with a small brush and paint in the colors. Apply several layers to intensify the color. Use the Water Brush to float water all around the background and then add the Distress Stains into the water. This creates a softer background color. Trim around the edges and layer onto a slightly larger piece of black chipboard.
6. Lay 2 strips of tape along the dried crackle-painted areas to mask off the center stripe. Add the Picket Fence Crackle Paint. Let it set up a bit and remove the tape gently. Allow to dry completely. Poke off a few pieces here and there to make it more distressed and worn looking. Add Pumice Stone Distress Stain and Tea Dye into the cracks. Then add Brushed Corduroy Distress Ink around all the edges for a bit more color aging with the Blending Tool and Foam.
7. Glue the tag to a piece of chipboard cut slightly larger than the tag with Multi-Medium. Stamp a row of Stars across the bottom using the Rockstar Set and Jet Black Archival Ink.
8. Run a 4×4 piece of Metal Foil Tape through the Vagabond machine with the Cracked Texture Fade. Peel off the backing and add to black chipboard. Trace 3 stars of different sizes onto the back using the Starry Starry Night Stencil. Cut out with Snips.
9. Assemble the tag as shown. Use Pop it Shapes to add the stars for a little more dimension and Multi-Medium for the stamped images. Punch a hole in the top and tie 2 pieces of hand-dyed ribbon into a bow.


