by Jenny Marples

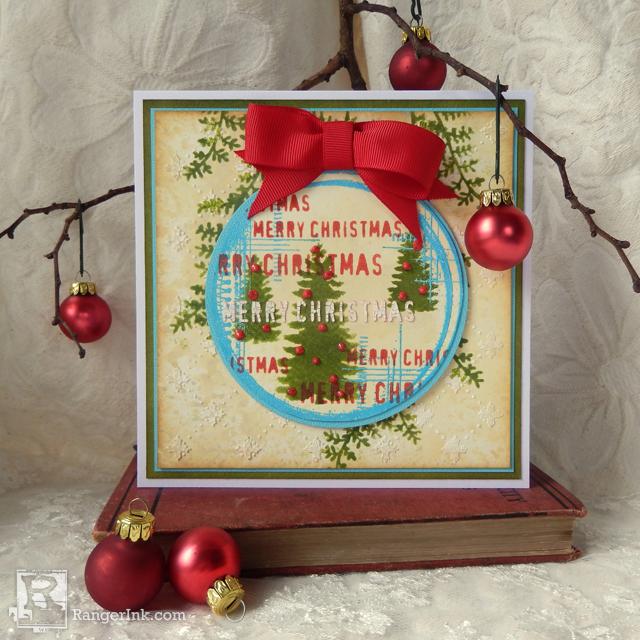
Christmas Bauble by Jenny Marples
- Materials
- Instructions
- Archival Ink™ Designer Series: Wendy Vecchi : Fern Green, Leaf Green, Carnation Red, Forget Me Not
- Wendy Vecchi Embossing Powder : Forget Me Not
- Ranger Emboss it™ Clear Ink
- Ranger Texture Paste : Opaque Crackle
- Liquid Pearls™ : Brass
- Tim Holtz® Distress Collage Mediums : Matte
- Tim Holtz® Distress Ink Pads : Antique Linen, Brushed Corduroy
- Ranger Surfaces Watercolor Paper
- Tim Holtz® Distress Sprayer
- Archival Ink Cleaner
- Ranger Heat it™ Craft Tool
- Ranger Mini Blending Tool with Foam
- Ranger Non-Stick Craft Sheet™
- Stampers Anonymous Studio 490 Wendy Vecchi Background Stamps: Circle Collage, Herringbone.
- Stampers Anonymous Studio 490 Wendy Vecchi Stencils: Ferns, Vintage Quilt, Happy Holidays
- Tim Holtz Stamp Platform
- 6” White Card Blank
- Coordinating Cardstock
- Red Ribbon
Instructions

Step 1: Press the Antique Linen Distress Oxide Ink pad onto the Craft Sheet to release some of the ink. Mist with a little water with the Distress Sprayer onto the ink to form beads of color. Dip both pieces of Watercolor Paper into the ink repeatedly, drying with the Heat It Craft Tool between each application.

Step 2: Stamp the Circle Collage image onto the larger square of card using Forget Me Not Archival Ink. When dry, apply Opaque Crackle Texture Paste through the Vintage Quilt Stencil. By masking off the top section and overlapping the stencil you can cover the entire background evenly..

Step 3: Use the Mini Blending Tool to apply Fern Green Archival Ink through the Ferns Stencil to create a cascade of foliage across the stencilled background. Use another Mini Blending Tool to blend Brushed Corduroy Distress Ink around the edges of the background paper.

Step 4: Place the Circle Collage Stamp onto the Stamp Platform and stamp the image onto the smaller piece of inked Watercolor Paper using Forget Me Not Archival Ink. Leave the stamp in place and remove any remaining traces of ink using Ranger Archival Ink Cleaner.

Step 5: Use the Mini Blending Tool to apply Leaf Green Archival Ink through the tree images on the Happy Holidays Stencil. Apply Fern Green Archival Ink onto the Herringbone Background Stamp and press through the same tree images on the Stencil to create a patterned effect.

Step 6: Put the Paper back onto the Stamp Platform in the same position as previously. Cover the un-moved Circle Collage Stamp in Emboss It Ink and re-stamp over the original image. Cover the Embossing Ink with Forget Me Not Embossing Powder and heat set with the Heat It Craft Tool.

Step 7: Cut out the embossed Circle Collage image before stencilling through the Happy Holidays Stencil lettering using Carnation Red Archival Ink and Opaque Crackle Texture Paste. Mount onto a 4” circle of Watercolor Paper embossed with Forget Me Not Embossing Powder. To finish, apply dots of Brass Liquid Pearls onto the trees. I added drops of Carnation Red Enamel Accents over these dots when dry to make them stand out more. Finally adhere the bauble and a ribbon bow onto the background card, mat and layer onto coordinating cardstock and mount the completed design onto the card blank.

Your Cart
- Choosing a selection results in a full page refresh.


