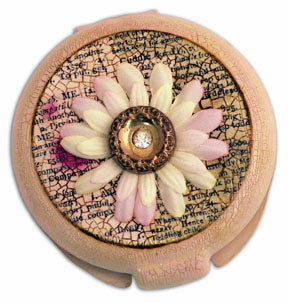
Create a new memory heirloom with Crackle Accents™ and Glossy Accents™!

Baby Lois Compact with Glossy Accents™ By Lisa Dixon
- Materials
- Instructions
- Adirondack® Acrylic Paint Dabbers - Lights: Shell Pink, Willow, Cloudy Blue
- Distress™ Ink Dye Stamp Pads - Brushed Corduroy
- Inkssentials™ Glossy Accents™
- Inkssentials™ Crackle Accents™
- Inkssentials™ Non-Stick Craft Sheet
- Inkssentials™ Cut n’ Dry™ Foam
- Perfect Pearls™ Pigment Powders - Blush
- Perfect Medium™ Stamp Pad - Clear
- Patterned Paper, 7 Gypsies, 7gypsies.com
- Transparency, Staples brand, staples.com
- Dollar Store Mirror Compact
- Seed Beads, Cream and Pink, Mill Hill, millhillbeads.com
- Pin, Making Memories, makingmemories.com
- Other – spray adhesive, alphabet beads, natural muslin, pink scrap fabric, chipboard, vintage button, foam paintbrush, quilt batting, embroidery floss, needle, upholstery trim, silk flowers, sandpaper
Instructions
(1) Sand the outside surface of the compact and wipe away residue with a damp cloth. If your compact contains a cake of makeup, remove and discard.
(2) Working on the Non-Stick Craft Sheet, use Cloudy Blue Paint Dabber to cover the inside and outside of the compact. Avoid paint on the mirror portion of the compact.
(3) When dry, follow with a coat of Shell Pink paint. Add touches of Willow paint using a small square of Cut n’ Dry foam. Allow the paint to dry completely.
(4) Cut a circle from patterned paper about 2½” in diameter. Use Cut n’ Dry foam to ink the edges with Brushed Corduroy Distress Ink and adhere to the outside lid of the compact.
(5) Use a foam paint brush to apply a thin coating of Crackle Accents to the entire outside of the compact. Some brushstrokes will remain but you’ll achieve small well-defined crackles with a thin coat of the Accents. Allow to dry completely for all the cracks to appear.
(6) Once dry, rub Brushed Corduroy ink with square of Cut n’ Dry Foam over the crackled surface to further define the cracks. Wipe excess ink away with paper towel.
(7) Print vintage photo onto transparency and trim to fit mirror portion of the compact.
(8) Use Cut n’ Dry Foam to apply Perfect Medium to the printed side of the transparency. Use cosmetic brush to apply Blush Perfect Pearls pigment powder to Perfect Medium side of the transparency. Adhere the transparency to the mirror using a spray adhesive.
(9) Add Glossy Accents to cover the photo and fill the mirror well. Use a pin to immediately pop any air bubbles that form. Add tiny seed beads into the wet glaze around the perimeter of the mirror. Allow to dry to a clear and shiny finish.
(10) Apply additional coats of Glossy Accents as desired to add dimension and to further secure the beads. Be sure to allow each coat to dry thoroughly before adding the next coat of glaze.
(11) To make the fabric inset for the bottom of the compact cut a circle from natural muslin about 3-1/8″ in diameter. Cut a small swatch from pale pink fabric and use embroidery floss and needle to stitch the word “Baby”. Tack to the muslin circle and sew alphabet beads to spell out name in beads underneath. Add some stitched buttons beneath the name. Be sure your embroidery, beads and buttons are centered in the muslin circle.
(12) Cut a circle from chipboard and a circle from quilt batting both about 2-1/8″ in diameter. Sandwich the batting between the chipboard and the embellished muslin circle. Use a tiny amount of spray adhesive on the batting to prevent shifting. Turn all the layers over and snip the overhanging edges of the muslin about every ½” to create flaps. Use Glossy Accents to glue each cut flap to the back of the chipboard. Use the Glossy Accents to adhere a length of upholstery trim around the edges and to glue the fabric inset into the bottom of the compact. Add a quilter’s pin to the embroidered swatch.
(13) Layer two pastel silk daisies and attach the flowers to the lid of the compact. Add a vintage button to the flower center using strong double-sided tape to complete the project.


