by Jenny Marples

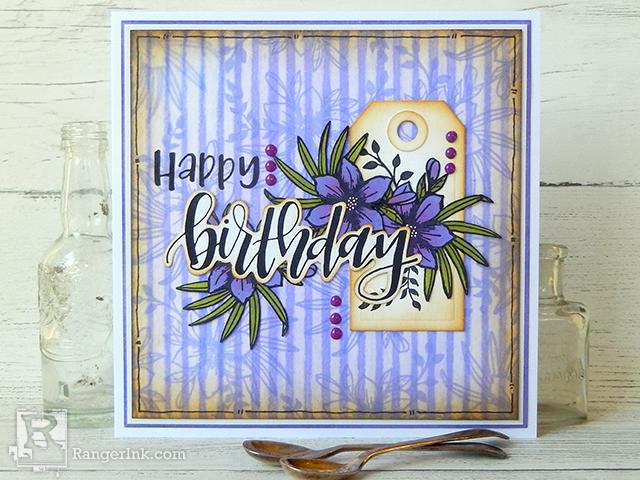
Archival Removal Birthday Card by Jenny Marples
- Materials
- Instructions
- Wendy Vecchi Archival Ink™: Violet, Cactus Flower, Leaf Green
- Wendy Vecchi Enamel Accents: Cactus Flower
- Archival Ink™ #0 Pads: Jet Black
- Archival Ink Cleaner
- Letter It™ Stamp Sets: Birthday
- Ranger Watercolor Paper
- Ranger Detail Blending Tools
- Ranger Mini Blending Tool with Foam
- Ranger Heat it™ Craft Tool
- Tim Holtz Distress® Ink Pads: Brushed Corduroy
- Stampers Anonymous Studio 490 Wendy Vecchi Stamp Set: Birthday Art
- Stampers Anonymous Studio 490 Wendy Vecchi Stencil: Yikes Stripes
- Tim Holtz Sizzix Framelits Die Set 8Pk: Tag Collection
- Tim Holtz Tonic Studios Stamp Platform
- Fine Tip Black Pen
- Fine Tip White Pen
- 6-inch Square White Card Blank
Instructions

Step 1: Cut a 5 ½-inch square of Watercolor Paper and blend Violet Archival Ink all over using a Mini Blending Tool. The blending doesn’t have to be perfect at this stage as the next step will disguise it.

Step 2: Place the Yikes Stripes Stencil over the card then gently drag the Archival Ink Cleaner dabber top along it to remove the ink from the uncovered areas. The ink will fade gradually so don’t overdo it!

Step 3: Dry the remaining ink and cleaner thoroughly with the Heat It Craft Tool. Repeat stamp the flower from Wendy Vecchi’s Stamp Set ‘Birthday Art’ all over the striped background using Violet Archival Ink.

Step 4: Die cut a small tag from Watercolor Paper. Using Jet Black Archival Ink stamp the same flower used on the striped background onto the tag as shown. The image will not fit completely on the tag.

Step 5: Blend Brushed Corduroy Distress Ink around the edges of the tag and the striped floral background by tipping your Mini Blending Tool to a 45-degree angle and applying the ink gently.

Step 6: Using Jet Black Archival Ink, stamp the same flower added to the background and tag onto a piece of Watercolor Paper with the Stamp Platform. Leave the stamp in place on the platform.

Step 7: Using the stencil in the Stamp Set ‘Birthday Art’, place the corresponding leaf section over the stamped flower and use a Detail Blending Tool to blend Leaf Green Archival Ink onto the leaves.

Step 8: Leaving the stencil in place from Step 7 use a Detail Blending Tool to blend Violet Archival Ink onto the flower buds. Using a dabbing motion to apply the ink can help with achieving accuracy.

Step 9: Place the corresponding flower section on the stencil over the stamped flower and blend Violet Archival Ink over it using the Mini Blending Tool. I taped over a section next to the flower to avoid it.

Step 10: Leaving the stencil in place use a Detail Blending Tool to dab Cactus Flower Archival Ink onto the centre of the flower. This process can also be repeated on the flower buds’ sections if required.

Step 11: Return the colored flower image to the Stamp Platform, placing it in exactly the same position as before. Re-stamp the flower image using Jet Black Archival Ink to embolden the image details.

Step 12: Repeat Steps 6 to 11 twice more to create three colored flowers in total. Add white dots to the center of the flowers with a fine tip pen. Then carefully cut out each of the flower images with scissors.

Step 13: Add the tag and flowers to the background as shown. Stamp the word Happy from the Letter It™ ‘Birthday’ set onto the background and the word Birthday onto a separate piece of Watercolor Paper.
To finish cut around the stamped word Birthday, leaving a small border and blending Brushed Corduroy Distress Ink onto the edges as shown previously. Layer the word over the flowers on the background. Using a black fine tip pen draw a border around the edge of the background. Finally add dots of Cactus Flower Enamel Accents between the sentiment and flowers. When dry, layer onto coordinating pieces of colored card before adding to a 6-inch square white card blank.


