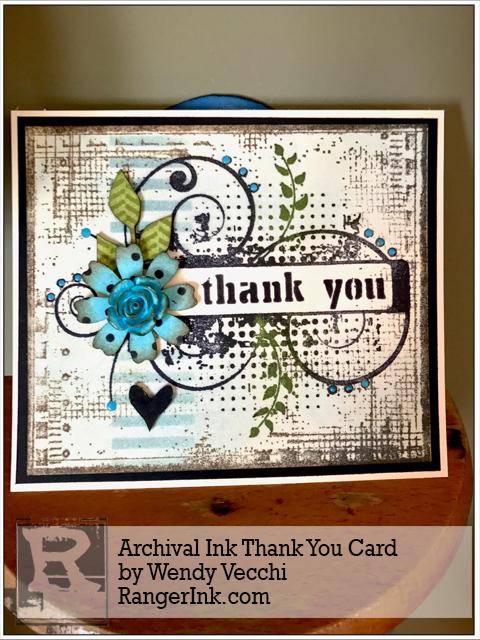
by Wendy Vecchi

Archival Ink Thank You Card by Wendy Vecchi
- Materials
- Instructions
- Tim Holtz Distress® Mixed Media Heavystock
- Archival Ink™ Designer Series: Wendy Vecchi : Sky Blue, Fern Green
- Wendy Vecchi Mini Archival Ink Kits : Leaf Green, Forget-Me-Not, Potting Soil, Watering Can
- Archival Ink™ #0 Pads : Jet Black
- Wendy Vecchi Enamel Accents : Forget-Me-Not
- Ranger Mini Blending Tool with Foam
- Ranger Non-Stick Craft Sheet™
- Dylusions Journal Tape Sheets
- Ranger Multi-Medium : Matte
- Ranger Artist Brush Set
- Wendy Vecchi/Stampers Anonymous Mat Minis: Flowers and Leaves (WVMM15) Have A Heart (WVMM06)
- Wendy Vecchi/Stampers Anonymous Stamps: Herringbone (WVBG037), Rectangle Collage (WVBG035)
- Wendy Vecchi/Stampers Anonymous Stencils: Select-A-Sentiment (WVSTST037) Lots of Dots (WVSFA040) Stripes (WVSFA006)
- Tim Holtz Idea-ology: Resin Rose
- Tim Holtz Tonic Stamp Platform
- Black Cardstock
- Painter
- Towel
- Post-It Note
Instructions

Step 1: Insert 4 1/4 x 4 3/4 inch heavy stock base into the corner of the Stamp Platform. I cut this a little larger to allow for room for the magnets. Position the rectangle collage background stamp in place in the platform.

Step 2: Ink the stamp with both Potting Soil and Watering Can. The mini pads work great for this!

Step 3: Position the Select-A-Sentiment stamp over the base. Ink the leaf areas with the mini Leaf Green pad and stamp.

Step 4: Ink the whole stamp with Jet Black, then wipe away the ink from the leaves with a towel. Stamp and repeat as needed to have a fully inked image. DRY. Trim the excess cardstock, using the stamp edges as a guide. Ink the cardstock edges lightly with Potting Soil.

Step 5: Use the Blending Tool to ink the base with Sky Blue, leaving the label area uninked. Position the stripes stencil toward the left and use Sky Blue again to stencil stripes above & below the label.

Step 6: Make a loop of painter’s tape to hold the card base securely to the craft sheet. Choose the sentiment from the Select-A-Stencil (I chose thank you) and position in the label area. I moved it to the far right, to leave room for the flower. BUT…you could center it and use no flower or you could position the sentiment far left & add the flower on the right.

Step 7: Move the rotating window in place and use a post-it to mask off the heart area in the bottom rotating window. Ink the Blending Tool with Jet Black, place it over the stencil, then twist & turn to add ink. The stencil protects the background. DRY.

Step 8: Ink the mat mini leaves with Leaf Green, then ink the herringbone stamp with Fern Green & stamp over the leaves.

Step 9: Ink the mat mini flower with Forget-Me-Not, then add polka dots with the stencil and Watering Can. Add shading to the petal edges with Potting Soil.

Step 10: Place a piece of the Tape Strip on the Craft Sheet and it will hold the rose in place. Paint the rose with a paint brush and Forget-Me-Not Enamel Accents and allow to dry. When dry (about 2 minutes) swipe the mini Potting Soil pad over the raised edges to add more detail. Glue the rose to the center of the mat mini flower with Multi Medium.

Step 11: Use the Forget-Me-Not Enamel Accents to fill in the dots on the stamped image & allow to dry. I also added dots to the ends of the flourish on the left.

Step 12: Add the card base to a slightly larger black cardstock base & then to a heavy stock card.

Step 13: Add the black mat mini heart, the leaves & flower as shown, to the left side.
Things to Note:
Your Cart
- Choosing a selection results in a full page refresh.


