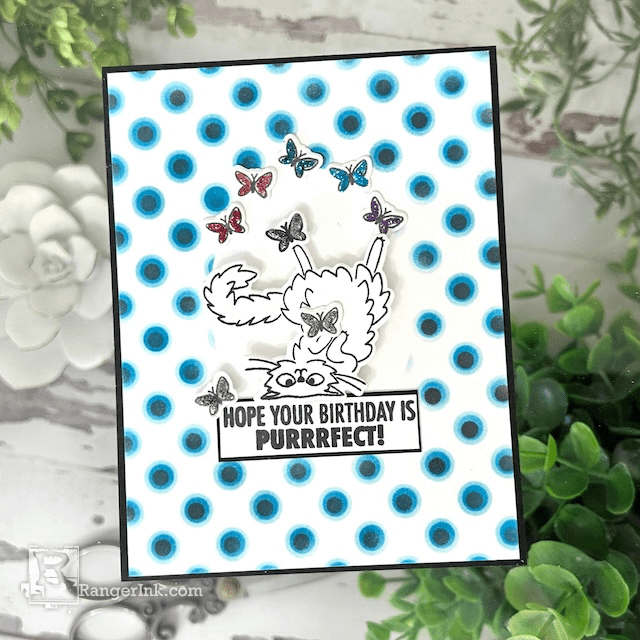
Purrfect Birthday Wishes! In this tutorial, Kimberly Boliver uses the latest Archival Inks and Stickles to whisker up a birthday card that is sure to make any cat lover happy.

Archival Ink & Stickles Birthday Card by Kimberly Boliver
- Materials
- Instructions
Stickles™ Glitter Glue Beach Cruiser
Stickles™ Glitter Glue Wine Cellar
Stickles™ Glitter Glue Cayenne
Stickles™ Glitter Glue Mountain Lake
Stickles™ Glitter Glue Aubergine
Archival Ink™ Pad Graphite
Archival Ink™ Pad Mountain Lake
Archival Ink™ Pad Beach Cruiser
Simon Hurley create. Photopolymer Stamp Purrfect Cats
Simon Hurley create. Spellbinders Purrfect Cats Die
Simon Hurley create. Stencil Polka Dot Assortment
Tim Holtz Distress® Black Heavystock
Tim Holtz Distress® White Heavystock
Wendy Vecchi Perfect Cardstock White Cards
Ranger Silicone Mat
Ranger Mini Ink Blending Tool Domed Replacement Foam
Ranger Mini Ink Blending Tool
Wendy Vecchi MAKE ART Perfect Card Adhesive
Letter It™ White Foam Roll Tape
Instructions
This is such a fun card to make for any cat lover in your life! These new Ranger Archival Inks blend together to make a fun background and the new Stickles are perfect to add sparkly color to the butterflies!

Step 1: Stamp the cat image and 8 butterflies from the Simon Hurley create. Purrfect Cats Stamp Set on a piece of Tim Holtz White Heavystock using Graphite Ranger Archival Ink. Die cut the cat and butterflies using the matching Purrfect Cats die set. Stamp the sentiment and trim it down.

Step 2: Add the following Stickles to each butterfly: Wine Cellar, Cayenne, Beach Cruiser, Mountain Lake, and Aubergine. Add the Graphite Stickles to three of the butterflies. Let them dry completely.

Step 3: To get the white space inside the stenciled background you will need a die cut mask of any shape. I used an oval. Center the die cut mask on a 5 3/8” x 4 1/8” Tim Holtz Heavystock white panel and line up the Polka Dot Assortment 1 stencil from Simon Hurley create. Blend Beach Cruiser Archival Ink over the whole white panel.

Step 4: Keeping the mask in place, line up the Polka Dot Assortment 2 stencil over polka dots on the white panel and blend Mountain Lake Archival Ink over the whole panel.

Step 5: Line up the Polka Dot Assortment 3 stencil over the polka dots on the panel and blend Graphite Archival ink over the whole panel. Then remove the mask.

Step 6: Cut a piece of black Tim Holtz Heavystock to 5 ½” x 4 ¼” and a piece just a little bigger than the sentiment. Assemble the card using Wendy Vecchi Perfect Card Adhesive and adhere it to a white Wendy Vecchi card base. Use Letter It Foam Tape to pop up the cat.


