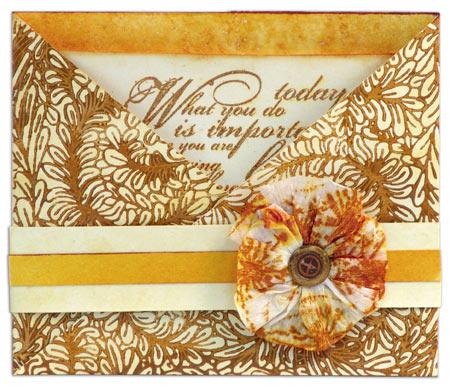
Use coordinating Adirondack® Earthtone products to make this clever criss-cross card!

Adirondack® Criss-Cross Card By Lisa Dixon
- Materials
- Instructions
- Tim Holtz® Alcohol Ink Applicator
- Ranger Paper Creasers
- Ranger Ink Blending Tool & Foam
- Ranger Mini Misters
- Ranger Heat it™ Craft Tool
- Ranger Non-Stick Craft Sheet™
- Tim Holtz® Alcohol Inks
- Inkssentials™ Matte Accents™
- Smooth White Cardstock, Bazzill, bazzillbasics.com
- Rubber Stamps, Stamp Camp, Big Floral Background, stampcamp.com; Stamper’s Anonymous, Tim Holtz Collection (Nature’s Moments #CMS001 and What You Do #K5-1155), stampersanonymous.com
- Other – adhesive, water, foam brush, needle, thread, metal button, white crepe paper streamer, paper towels
Instructions
(1) Cut two 4¼” x 10″ strips of white cardstock for the card base.
(2) Working on the Non-Stick Craft Sheet, spray one side of each strip with Mini Mister containing water. Once wet, spray papers with Butterscotch Color Wash. Blot excess color with a paper towel. Dry with Craft Tool.
(3) Turn each strip over for background stamping. Use Butterscotch Paint Dabber to apply paint to floral background and stamp images to cover the cardstock strips. Let dry or speed drying with the Craft Tool.
(4) Use the Non-Stick Craft Sheet as a palette to mix a diluted paint of water and Butterscotch Dimensional Pearls. Use a foam brush to paint a wash over the stamped images. Let dry or speed drying with the Craft Tool.
(5) Place both strips stamped side down. Use Paper Creaser to score each strip down the center at 5″. Cut one scored strip diagonally from the top center down to the bottom right. Cut the other.
(6) Add adhesive to the stamped rectangle back of one of the strips. Adhere both strips together making sure the long edges of both triangle sections are at the bottom. Lay card base Color Washed side up and add adhesive only to the very bottom of the center section. Fold the left triangle over and adhere. Add adhesive to the bottom of the remaining triangle flap. Fold over and adhere. Use Blending Tool and Foam to ink the edges of the completed card base with Butterscotch Dye ink.
(7) Cut a 3¼” x 4¾” rectangle of white cardstock for the card insert. Cut a 1″ x 11″ strip of white cardstock for the card band.
(8) Ink sentiment stamp with Butterscotch Dye ink and stamp image towards the top of the card insert. Sprinkle with Butterscotch Embossing Powder, tap off excess and heat emboss with the Craft Tool.
(9) Use the Non-Stick Craft Sheet as a palette to mix a diluted paint of water and Butterscotch Dimensional Pearls. Paint a wash over the card insert and the card band. Let dry or speed drying with the Craft Tool.
(10) Use Blending Tool and Foam to ink the edges of the card insert with Butterscotch Dye ink. Place card inside the base.
(11) Wrap the band around the card base and adhere the ends together at the front of the card. The seam will be covered later with the flower embellishment.
(12) Cut a 3/8″ x 5″ strip of white cardstock. Working on the Non-Stick Craft Sheet, spray one side of the strip with Mini Mister containing water. Once wet, spritz with Butterscotch Color Wash. Blot excess color with a paper towel. Dry with Craft Tool. Adhere across the center of the card band.
(13) Cut a 10″ length of white crepe paper streamer. Ink floral rubber stamp (Stamper’s Anonymous) with Butterscotch Dye ink and stamp images along the length of the streamer. Spritz lightly with water in a Mini Mister to make the colors run slightly and dry with a Craft Tool.
(14) Use a needle and thread to sew a running stitch down the center of streamer. Pull the ends of the thread together to bunch up the streamer into pleated folds and flatten into a flower shape. Adhere over the seam on the card band with Matte Accents.
(15) Colorize a metal button with Butterscotch Alcohol ink using the Alcohol Ink Applicator and Felt. Once dry, attach the button to the center of the flower embellishment using Matte Accents.
Your Cart
- Choosing a selection results in a full page refresh.


