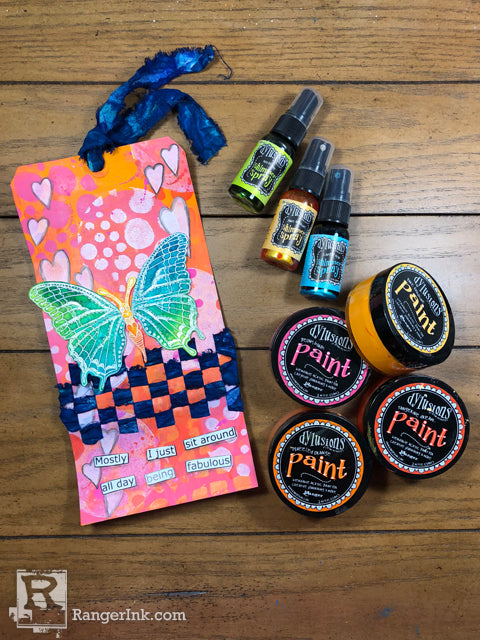
Hi, and welcome to a new tutorial. This is Josefine and today I’m sharing a fun technique on how you can add fabric to your tags and how to use the small, round Gel Plate for bright and cheery accents.

A Summer Night Dylusions Tag by Josefine Fourage
- Materials
- Instructions
- Dylusions Paint: Pure Sunshine, Squeezed Orange, Tangerine Dream, Peony Blush, White Linen
- Dylusions Paint Pens: Bubblegum Pink, Tangerine Dream
- Dylusions Ink Sprays: After Midnight, Calypso Teal, Polished Jade, Tangerine Dream, Lemon Zest
- Dylusions Shimmer Sprays: Pure Sunshine, Fresh Lime, Calypso Teal
- Dylusions Stencils: Small Sugar Lumps, Small Giraffe, Large Holes, Large Heart Borders
- Dylusions Stamps: Flight of Fancy
- Gel Plates: 3 pack
- Gel Plate Printing Brayers: Small
- Dylusions Colouring Sheets
- Dylusions Journaling Tags: #12 Mixed Media Cardstock
- Ranger Emboss It™ Ink Pad Clear
- Ranger Embossing Powders: Clear
- Ranger Heat it™ Craft Tool
- Ranger Adhesive Foam Rolls: White
- Ranger Non-Stick Craft Sheet™
- Black Watercolor Pencil
Instructions
I love Dyan’s style and that it allows me to step out of my comfort zones, work with bright colors, design with odd shapes, fancy images and so much more. I couldn’t decide on an idea for just one art journal page, so I made an entire journal. Let’s jump right in

Step 1: First, I wanted to dye the fabric. Muslin is perfect for those techniques, so I ripped a few strips off of a larger piece and spritzed After Midnight, Calypso Teal and Polished Jade Dylusions Ink Sprays on top. I saturated the fabric strips really well and then crinkled them up to let them dry like this.

Step 2: For the tag, I used a size 12 Mixed Media Cardstock Dylusions Tag and blended Dylusions Paint in Pure Sunshine, Squeezed Orange, Tangerine Dream and Peony Blush with a baby wipe all over it. After the first layer was dry, I added a second layer to make the colors even brighter.

Step 3: The tag needed some texture. I love to use a Gel Plate for that and the set of 3 from Ranger has great sizes to play around with. I didn’t want to create a monoprint on the entire tag at once, so I decided to use the 3 1/2″ x 6 3/4″ size rectangle and a few of the small Dylusions stencils. Then I used the same Dylusions paints, spread them onto the Gel Plate and pressed parts of the tag on top.

Step 4: First, I used the Sugar Lumps stencil and for the second layer the Giraffe stencil. Both have similar shape styles, but are different enough to create an interesting background.

Step 5: Layer number 3 is combining the 3” round Gel Plate with the Holes stencil. I placed the stencil on top of the tag, brayered Peony Blush onto the Gel Plate and then pressed the plate on top of the stencil. I did this a couple of times, all over the stencil. In addition, I added a few circles without the stencil in between to the tag.

Step 6: To add even more interest to the circles, I used the same technique – with and without the stencil – but this time with a contrasting color. I thought that white would be perfect as I wanted to keep the overall color scheme bright and cheery.

Step 7: These bubbles now look like super fun polka dots and I highlighted a few of them with the Dylusions paint pens in Bubblegum Pink and Tangerine Dream. I used the same pens to add splatters all over the tag.

Step 8: I felt like my background still needed a little something. After thinking about it for a little bit, I knew what it was – hearts. I wanted them to stand out and not blend into the background too much, so I stenciled them with the Hearts Border stencil and later outlined them with a black watercolor pencil.

Step 9: I was done with the background. Next step was to prepare the tag for the muslin strips. I decided to weave them into the tag by cutting a few lines at the bottom third. Each paper strip is approx. 1.5” wide. Once I was done with that, I took the muslin strips and weaved it back and forth 5 times and adhered the overlapping pieces to the back.

Step 10: For the final accent piece, I stamped the butterfly from the Flight of Fancy set using embossing ink, heat embossed it with clear embossing powder and then added Dylusions Ink in Calypso Teal and Polished Jade, plus a little Shimmer Spray in Fresh Lime and Calypso Teal to the wings. For the body of the butterfly, I used the sprays in Tangerine Dream and Lemon Zest and added a little shimmer with the Pure Sunshine Shimmer Spray. Now I adhered all of the pieces to the tag using foam tape.
I also added a sentiment from the Dylusions Colouring Sheet to the bottom of the tag and outlined the words with a black watercolor pencil.


