Instructions
Hello Makers! When I saw the new Alcohol Neons, as a child of the 80’s, I was compelled to try and make a rad neon leopard print. I have admitted before that I am a novice at using Alcohol products, so this technique took me a few tries. That being said, if I could make today’s card, you can too! I’m inviting you to come along, and let’s get wild making leopard prints!

Step 1: Gather all the supplies.

Step 2: Begin by trimming a 5x7 piece of Yupo to 4.75 x 6.75, then sprinkle a generous amount of Alcohol Blending Solution onto the Yupo. Add drops of Razzle and Hyper Neons into the blending solution on the Yupo. Use the Alcohol Blower to blow the neons around and off the sides the Yupo to make a soft card front.

Step 3: It should look something like this. When you achieve the look you want, allow it to dry.

Step 4: Trim another 5x7 piece of Yupo in half so you have two 2.5x7 inch pieces of Yupo. You will only use one of them. Put some Hyper Neon and Blending Solution on a felt blending tool and color the entire 2.5x7 piece. Let dry.

Step 5: On a clean piece of Blending Felt, put some Razzle Neon and Blending Solution in a small dot. Stamp the dots randomly across the Hyper background. Let dry.

Step 6: On a third piece of Blending Felt, put some of Black Alcohol ink in a squiggly horseshoe shape about the size of the dot that was previously stamped. Note that it should be thin. It will spread as you stamp it.

Step 7: Stamp the black outline on each of the purple dots. This won’t be perfectly lined up and that is fine, but there should be some purple showing in the center of the black outline. It should be imperfect and look similar to the photo when you are finished. It might take a few attempts to get a leopard print you like. Practice makes perfect. Don’t get discouraged. Remember you can always clean off the piece of Yupo and start over.
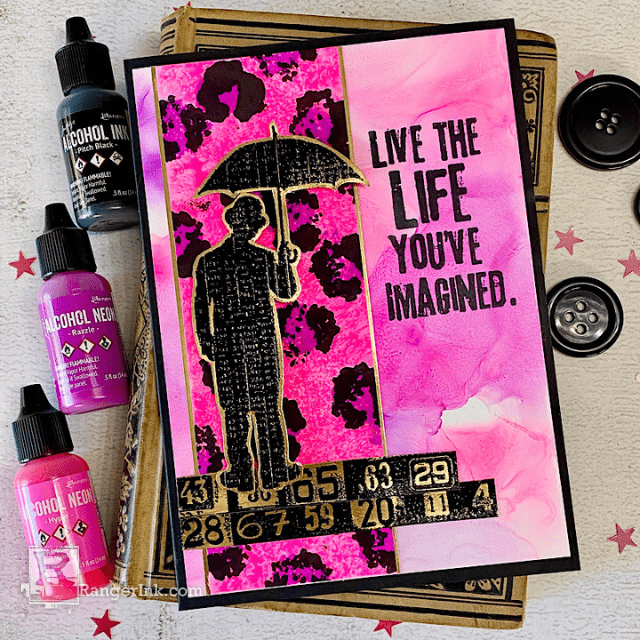
Once dry, trim the piece down to 2.25 x 6.75 and mat with gold metallic cardstock.

Step 8: Once dry, take the 4.75 x 6.75 background, stamp a sentiment like the one from Creative Muse CMS040. Use Black Soot Archival Ink to stamp directly onto the right side of the Neon card front.
Attach the gold matted leopard piece to the front left side of the card front .25 -.5” in from the left edge.

Step 9: On a piece of gold metallic cardstock, stamp an image or images you want to use on the card in Black Soot Archival Ink. Then emboss with Superfine Black Embossing powder and heat emboss. Trim around the image(s).
Cut and score a piece of Distress Black Heavystock into a 5x7 card base. Attach the Neon front piece to the black card base.

Step 10: This is a second card I made with this technique to show how changing the stamps with the same card base can totally change the feel. I used the Haberdashery CMS105 stamp set and the sentiment was from Handwritten Thoughts CMS218.

Thank you so much your interest in the tutorial today. I hope you found it inspiring and achievable, even for Alcohol product novices. Have a wild time experimenting with leopard prints!


 Tami is a school teacher by trade, but has been crafting in some way or another most of her life. She started scrapbooking 25 years ago as a hobby outside of work. A few years later she discovered the world of Tim Holtz Distress, which led to a whole new love of stamping, die cutting, and Idea-ology. Check out Tami on her Plays Well with Paper social media sites -