


One of the best things about 'Back to School' season is treating ourselves to new supplies! Follow along as Lauren Bergold transforms her Dylusions Agenda into a cute, ocean-themed planner using Liquid Pearls, Archival Inks, stencils, and more.
Back to School Dylusions Agenda by Lauren Bergold
- Materials
- Instructions
Instructions
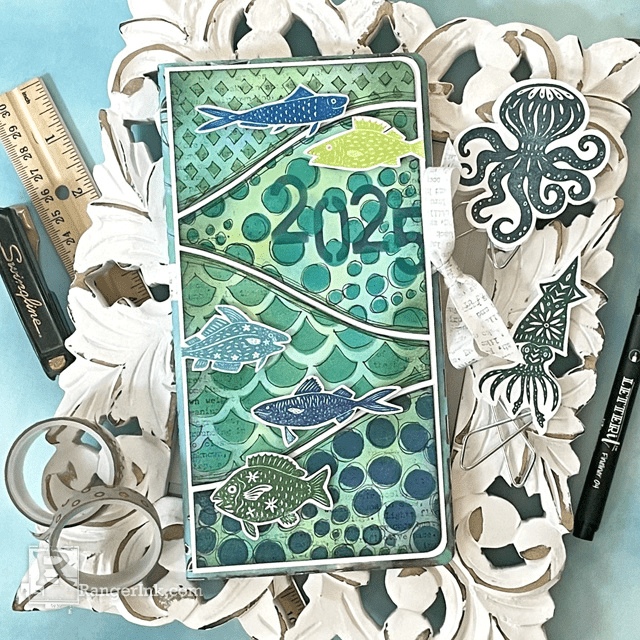
Being of a punning disposition, to me, nothing says, "Back to SCHOOL" as well as lots of colorful, whimsical fishes; so as soon as I saw Simon's Under the Sea Photopolymer Stamp Set, I knew exactly how I wanted to decorate my Dylusions Agenda Insert!

Step 1: Trim a piece of Simon Hurley create Stark White Cardstock to 3 7/8 x 7 3/4" and divide it into four curvy, interlocking sections. Cut the sections apart; they will serve as masks for the next four steps.

Step 2: Trim a second piece of cardstock to the same dimensions, and round the two right-hand corners; this will be the design panel. Mask off section two and position Simon Hurley's Tiny Diamonds stencil over section one. Use a Mini Ink Blending Tool and a clean Domed Foam to apply Sage Liquid Pearls through the stencil. Lift the stencil off immediately and clean it with warm water and dish detergent, or with Isopropyl Alcohol. Allow the stenciled area to dry to the touch before proceeding.

Step 3: Mask off sections one and three and position Dylusions Small Drip Drops stencil over section two. Use a Mini Ink Blending Tool and a clean Domed Foam to apply Bahama Bay Liquid Pearls through the stencil. Lift the stencil off and clean it promptly. Allow the stenciled area to dry to the touch before proceeding.

Step 4: Mask off sections two and four, and position Dylusions Stencil It Too so that the fishscale portion covers section three. Use a Mini Ink Blending Tool and a clean Domed Foam to apply Mermaid Liquid Pearls through the stencil. Lift the stencil off and clean it promptly. Allow the stenciled area to dry to the touch before proceeding.

Step 5: Mask off section three and position Dylusions Small Drip Drops stencil over section four. Use a Mini Ink Blending Tool and a clean Domed Foam to apply Deep Water Liquid Pearls through the stencil. Lift the stencil off and clean it promptly. Allow the stenciled area to dry to the touch before proceeding.

Step 6: Stamp the five fish from Simon Hurley's Under the Sea Stamp Set in Olive, Cobalt, Beach Cruiser, Sea Grass and Manganese Archival Inks. Use the coordinating dies or scissors to cut out the fish, leaving a small border of white around each.

Step 7: When all four stenciled sections are dry, use a Mini Ink Blending Tool and a couple of clean Domed Foams to apply Aquamarine and Sea Grass Archival Inks randomly all over the background of the design panel. Let the colors overlap at times and don't worry about getting a consistent shade, let some areas be darker and some lighter.

Step 8: Use the Mini Ink Blending Tool and Domed Foams to ink around the edges of the panel with Olive and Seafarer Archival Inks. Again, it's good to be quite random and let some of the color go further into the panel, with the shades overlapping each other and those already applied. When the color is to your liking, ink just the corners and edges of Simon Hurley's Typewriter Background Stamp with Jet Black Archival and press the corners of the design panel into the stamp so that it picks up some random bits of the typed text.

Step 9: Use Dina Wakley's School Style Alpha Stencil and Beach Cruiser Archival to add the numerals "2025" to section two of the design panel.

Step 10: Assembly: Use a Letter it Fineliner to add loose, scribbly outlines to the stenciled patterns and between each section of the panel, if desired, before cutting the sections apart along the curvy lines. Adhere the sections to a 4 x 8" panel of Stark White Cardstock with the two righthand corners rounded, leaving a very thin gap of white between the sections and around the outside edges. Add the stamped fish to the panel.

Step 11: Optional Extras: Adhere a 24" piece of ribbon to the cover of the Agenda before affixing the completed design panel to the Agenda. Stamp a few extra sea creatures on scraps of Stark White Cardstock, cut them out with an extra layer of un-stamped cardstock and hot-glue them to oversized paper clips.

Step 12: Decorate the inside of the journal with stamps, stencils and Dylusions Creative Dyary Stickers!
 My name is Lauren Bergold, and I live in central New Jersey with my husband of 30+ years and A LOT of art supplies! My favorite medium is paper, and I especially love making cards. I teach papercrafting classes, as well as collecting and compiling vintage and found papers. You can find me on my blog, All the Good Blog Names Were Taken, and on Instagram as @llaurenb where I love to connect with other artists and makers!