


Sparkle meets spooky! Tami Bastiaans shows how Distress Rock Candy + Chunky make haunted scenes twinkle with fright. 🌙✨
Distress Rock Candy Halloween Panel by Tami Bastiaans
- Materials
- Instructions
Instructions
Hello Makers! Today I’m sharing a quick little Halloween project using Distress Rock Candy Glitter and the NEW Rock Candy Chunky Glitter. I’m inviting you to come along and let’s get making!
 Step 1: Gather the supplies.

Step 2: Begin by removing the outer frame from one of the Etcetera Tiles. This is often a throw-away piece, but we are using it today. Put the tiles back into the package. Only the frame is needed. Remove two spacers from the Etcetera Façade package. Paint all three pieces with Black Soot Distress Paint and set aside to dry.

Step 3: For this step you need both glitters, the mixing cups and sticks, storage jars, and black Alcohol Ink. Deli sheets are also helpful to dry the glitter on, or a piece of parchment paper or copy paper will work, but not wax paper as it will stick.

Step 4: Pour some Chunky Glitter into one of the storage jars to measure the amount correctly. Then pour the chunky glitter into a mixing cup. Add 5-20 drops of Black Alcohol Ink and thoroughly stir until you get the color you want. Begin with 5 drops and after stirring slowly add more. Once the desired color is reached, spread the glitter out on paper to dry.

Step 5: Repeat step 4 with the Rock Candy Glitter. This will take a different amount of Alcohol Ink to achieve the desired color.

Step 6: Once dry, put the glitters back in their respective Distress Storage Jars. Now you have black glitter in two sizes to use throughout the Halloween season.

Step 7: The Etcetera frame should be dry, so with a pencil, draw the inside if the frame onto a piece of Distress Mixed Media Heavystock. Then to get three equal squares, take out one of the large Etcetera Tiles and use it to draw lines to make three even squares to stamp in.
Next, using Black Soot Archival Ink, stamp the graveyard scene from Halloween Sketchbook in all three squares with the moon toward the top of the square. On another piece of Mixed Media Heavystock Stamp three of the Trick or Treaters from Halloween Sketchbook.
Color all the images with Distress Watercolor Pencils. Color the area beneath the graveyard stamp down to the line separating the squares, with Black Soot Pencil as it will extend the hill for the other images.
Finish by blending the sky area of each box with Stormy Sky Distress Ink, and around the moon with a little Mustard Seed.

Step 8: Once the background stamped strip is colored, adhere it to the back of the Etcetera Frame with Distress Collage Medium. Using some strong scissors or snips or a Craft Knife, cut the Etcetera Spacers wide enough to fit across the frame to separate the three scenes. Adhere the spacer strips into place with more Collage Medium. Let dry.

Step 9: Once dry, adhere the entire piece to some Black Heavystock so the back of the piece is black and so it adds some sturdiness to the piece.
Get the glitter jars and the Glossy Accents ready. Add some Glossy accents in sketchy lines on the bottom of each square where the “ground” is. Then sprinkle with Distress Rock Candy Glitter, tap excess onto paper and return to storage jar. Let dry.
To finish the frame. Apply some Glossy Accents to the front of the frame in section and smooth out with a finger before sprinkling it with Chunky Glitter, tap excess onto paper and return to storage jar. Let dry.
 Step 10: The final touches are to cut the figures out with scissors. Once cut, color the edges with Stormy Sky so they blend in a little better with the background. Then lay them in a Splat Box and spray with Distress Resist Spray and let dry. This will give them a little thickness and make them shiny. Attach foam squares to the back and attach each image in one of the squares near the bottom of each square.
With a finger, lightly apply some Weathered Wood Distress Paint to the high areas on the Idea-ology Bat, Screwheads, and Word Plaque. Once dry attach them to the tops and bottom of the frame with Collage Medium and this will take an hour or so to dry.

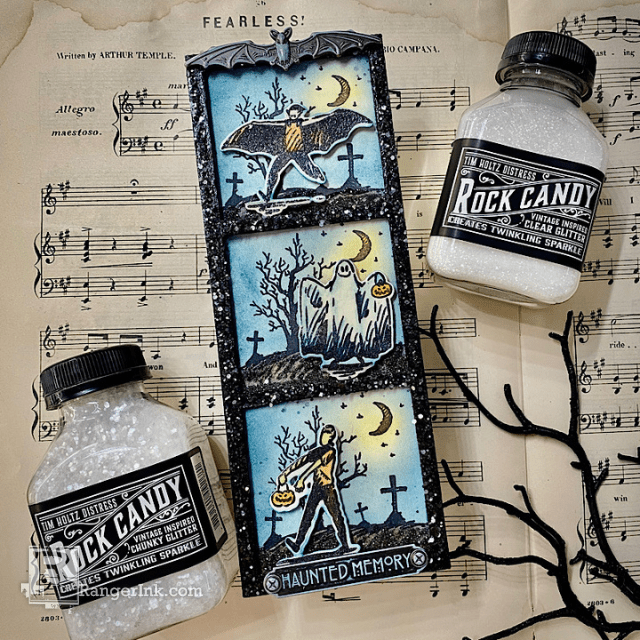
This is what the final piece looks like. If you have all of your supplies out and ready, it goes together fairly quickly and you have two jars of colored glitter when you are finished. This would make a fun gift for a friend or coworker.
Thank you so much for following along with the tutorial. I hope you will give this a try!
 Tami is a school teacher by trade, but has been crafting in some way or another most of her life. She started scrapbooking 25 years ago as a hobby outside of work. A few years later she discovered the world of Tim Holtz Distress, which led to a whole new love of stamping, die cutting, and Idea-ology. Check out Tami on her Plays Well with Paper social media sites - Instagram, YouTube, and Blog.